Introduction
Electromagnets, or magnets that use the magnetic field created by electrical current flowing through a wire, lie at the heart of many electrical devices, ranging from simple things like doorbells to complex machines, like particle accelerators. The strength of electromagnets varies, but some electromagnets are strong enough to lift entire trains! So how does an electromagnet work? How does electric current—the movement of electric charges—make a magnet?
When electric current flows through a wire, it creates a magnetic field. The magnetic field around a straight wire is not very strong. But if the wire is wrapped in a coil, the fields produced in each turn of the coil add up to create a stronger magnetic field. When the coil is wrapped in the shape of a cylinder, it is called a solenoid. (See Figure 1).
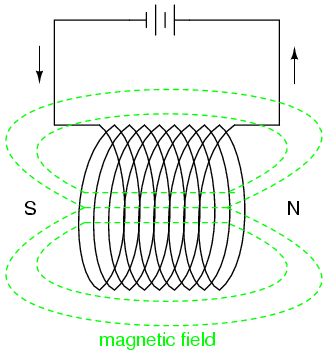
Figure 1. The green lines show the magnetic field surrounding a solenoid (or cylindrical coil) through which electric current is flowing. "N" and "S" indicate the north and south poles of the electromagnet.
If an electromagnet consists only of coiled wire (if it has nothing but air in its middle) then the magnet will not be very strong. But if you place a piece of iron in the middle of the coil—an iron bolt, for example—then the piece of iron, called the magnetic core or iron core of the electromagnet, will make the magnetic field much stronger (see Figure 2). This is because iron is ferromagnetic. It contains lots of tiny areas, called magnetic domains, that act like small magnets. As soon as the iron core is placed in the coil, the magnetic domains line up with the magnetic field made by the coiled wire solenoid. As a result, the strength of the magnetic field around the solenoid greatly increases.

Figure 2. Insulated wire (blue) wrapped around an iron core (black). Electric current flowing through the wire creates a magnetic field, a field that is magnified by the iron core.
In this science project, you will investigate how the strength of the magnetic field produced by an electromagnet changes as the number of turns in the coil increases.
Terms and Concepts
To do this project, you should do research that enables you to understand the following terms and concepts:
- Electromagnet
- Electric current
- Solenoid
- Iron core
- Ferromagnetic
- Magnetic domains
Questions
- How does an electromagnet work?
- Why does an electromagnet have magnetic properties only when energized?
- Does increasing the current flowing through a coil of wire increase or decrease the strength of the magnetic field?
- What does adding an iron core to an electromagnet do to the magnetic field created by the electromagnet?
Materials and Equipment
- The Strength of an Electromagnet kit (1). Includes:
- 6 volt (V) lantern battery
- Enamel-coated magnet wire, 30 AWG (75 feet)
- Alligator clip leads (2)
- Iron bolts; about 2 ½ inches long and ½ inch in diameter (4)
You will also need to gather these items, not included in the kit:
- 220 grit sandpaper (about 1 square inch)
- Masking tape (1 roll)
- Box of steel paper clips (about 100 count)
- Scissors or wire cutters
- Optional: shallow plastic container, slightly longer and wider than the iron bolts
Experimental Procedure
- Make four different electromagnets, with 50, 100, 150, and 200 turns of wire respectively, by wrapping the magnet wire tightly around the iron bolts. See Figures 3 and 4 for example electro magnates. It is important to wrap the magnet wire neatly around the bolts. Here are some tips to make wrapping easier (if you run into trouble doing the experiment, see the FAQ for more information):
- Leave a tail of wire (5-6 centimeters [cm] long) at each end of the coil. You will use these wire tails to connect the coil to the battery.
- Make a holder for the spool of magnet wire, so you can roll the wire right off the spool. For example, you can stick a pen or pencil through the spool, and tape the pencil to a couple of small boxes.
- Use a small piece of masking tape to attach the wire to the iron bolt, near where the head of the bolt connects to the shaft of the bolt.
- Turn the iron bolt to unwind the magnet wire from the spool. Use your fingers to keep the wire tight against the bolt. Wrap each successive turn so that the wire lines up neatly. Remember that it is important to wind the wire tightly and neatly.
- Keep track of how many turns you make (or how many times you wrap the wire around the bolt). A turn happens each time the tape that holds the wire in place comes around. Counting turns is easier if you can recruit a helper to make tally marks for you.
- Troubleshooting Tip: If you are having trouble keeping track of how many turns you have made, here are two tips.
- First, draw a line straight down the iron core using a permanent marker. Count one turn each time you pass that line.
- Second, if you know the gauge of your magnet wire, you can look up the diameter of the wire in a table, like this one for American wire gauge. Once you know the wire's diameter, you can calculate how much of the bolt should be covered by a given number of coils. That means that 100 turns cover 1 inch of the bolt (0.01 inches x 100 = 1 inch), if the turns are right next to each other and do not overlap. So, if you wrap your coil very neatly, you can get a rough idea of how many turns are in your coil by measuring how much of the bolt is covered by the coil. Note that this method does not work if your coil has more than one layer of wire or if there are spaces between turns.
- When you reach the desired number of turns, tape the wire to the bolt to hold the coil in place. Cut the wire, leaving a 5-6 cm long "tail" for making the connection to the battery.
- Particularly for larger coils, you may need to wrap multiple layers of wire, one layer on the other, to get the desired number of turns.
- Use the 220 grit sandpaper to sand off 1 cm of the enamel insulation from the end of each magnet wire tail. Wire Stripping Tutorial for an instructional video that shows how to strip magnet wire.
- Fold a small piece of sandpaper (about the size of two postages stamps, use scissors to cut a small piece of necessary) in half, with the rough sides facing each other, to make a "sandpaper sandwich".
- Put the end of the magnet wire to be stripped inside the sandpaper sandwich.
- While softly pressing the sandpaper sandwich together, gently pull the wire through the sandpaper sandwich, turning the wire as you pull so that you remove the insulation from all sides of the wire. Or, you can rub the wire back and forth inside the sandpaper sandwich.
- The wire is stripped when you can see the shiny copper wire underneath.
- Troubleshooting Tip: It is a good idea to practice stripping the enamel insulation off a practice piece of wire. You may need some practice to get the pressure right so that the wire does not break while you sand it.
- Place the paper clips in a shallow container (slightly longer and wider than the electromagnet). If you do not have a shallow container, put the paperclips in a pile on a flat surface.
- Starting with the 50-turn coil, use the electromagnet to pick up paper clips from the shallow container.
- Use the alligator clip leads to connect the coil to the battery. When current flows through the coil, the coil is energized and will behave as a magnet. When no current flows through the coil, the magnetic characteristics of the electromagnet disappear.
- Troubleshooting Tip: After connecting the coil to the battery, you can check that the electromagnet works by touching a paper clip to the coil. If the paper clip sticks, then the electromagnet is working. If the paper clip does not stick, then the electromagnet is not working. If this is the case, make sure that the alligator clips are connected to both the battery and the wire. One end of each lead should be clipped to one of the terminals of the battery (one lead to each terminal), and the other end of each of lead should be clipped to the stripped part of the magnet wire (one lead to each end of the wire). If the clip leads are connected correctly to the coil and battery but the electromagnet is still not working, then the problem may be that the magnet wire was not completely stripped. Try re-sanding the ends of the magnet wire until all of the reddish insulation is gone, then reconnect and retest the electromagnet.
- Touch the energized coil (lengthwise) to the paper clips, and then pull the coil away from the tray. See Figures 3 and 4.
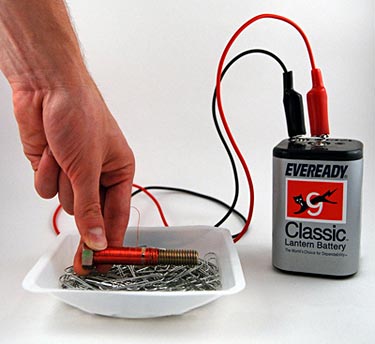
Figure 3. After connecting the alligator clip leads to the battery and wire on the coil, the electromagnet will be energized. Lower the electromagnet into the container of paper clips so that the long part of the electromagnet touches the paper clips.
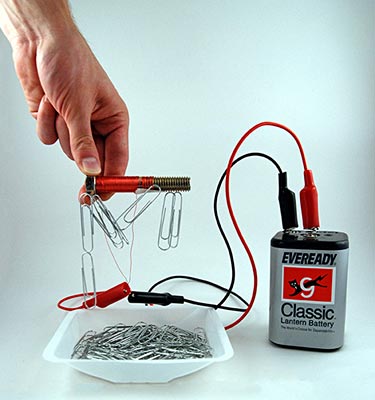
Figure 4. Once you have touched the electromagnet to the paper clips, lift the electromagnet up. Some of the paper clips will stick to the electromagnet. Move the electromagnet away from the container (so that the paper clips will not fall back into the container) and then disconnect the coil from the battery.
- Once the coil is no longer over the container, disconnect the coil from the battery, and count how many paper clips the coil picked up. Record the number in your lab notebook. Organize your data in a table like Table 1.
- Repeat steps 4a to 4c four more times, for a total of five trials.
- Repeat step 4 for the 100-, 150-, and 200-turn coils.
- Calculate the average number of paper clips lifted by each coil (see Table 1).
Number of Turns on Coils Number of Paper Clips Picked Up 1 2 3 4 5 Average 50 100 150 200
Table 1. Record the number of paper clips each coil picked up in each of the five trials and then calculate the average for the five trials.
- Leave a tail of wire (5-6 centimeters [cm] long) at each end of the coil. You will use these wire tails to connect the coil to the battery.
- Make a holder for the spool of magnet wire, so you can roll the wire right off the spool. For example, you can stick a pen or pencil through the spool, and tape the pencil to a couple of small boxes.
- Use a small piece of masking tape to attach the wire to the iron bolt, near where the head of the bolt connects to the shaft of the bolt.
- Turn the iron bolt to unwind the magnet wire from the spool. Use your fingers to keep the wire tight against the bolt. Wrap each successive turn so that the wire lines up neatly. Remember that it is important to wind the wire tightly and neatly.
- Keep track of how many turns you make (or how many times you wrap the wire around the bolt). A turn happens each time the tape that holds the wire in place comes around. Counting turns is easier if you can recruit a helper to make tally marks for you.
- Troubleshooting Tip: If you are having trouble keeping track of how many turns you have made, here are two tips.
- First, draw a line straight down the iron core using a permanent marker. Count one turn each time you pass that line.
- Second, if you know the gauge of your magnet wire, you can look up the diameter of the wire in a table, like this one for American wire gauge. Once you know the wire's diameter, you can calculate how much of the bolt should be covered by a given number of coils. That means that 100 turns cover 1 inch of the bolt (0.01 inches x 100 = 1 inch), if the turns are right next to each other and do not overlap. So, if you wrap your coil very neatly, you can get a rough idea of how many turns are in your coil by measuring how much of the bolt is covered by the coil. Note that this method does not work if your coil has more than one layer of wire or if there are spaces between turns.
- Troubleshooting Tip: If you are having trouble keeping track of how many turns you have made, here are two tips.
- When you reach the desired number of turns, tape the wire to the bolt to hold the coil in place. Cut the wire, leaving a 5-6 cm long "tail" for making the connection to the battery.
- Particularly for larger coils, you may need to wrap multiple layers of wire, one layer on the other, to get the desired number of turns.
- Fold a small piece of sandpaper (about the size of two postages stamps, use scissors to cut a small piece of necessary) in half, with the rough sides facing each other, to make a "sandpaper sandwich".
- Put the end of the magnet wire to be stripped inside the sandpaper sandwich.
- While softly pressing the sandpaper sandwich together, gently pull the wire through the sandpaper sandwich, turning the wire as you pull so that you remove the insulation from all sides of the wire. Or, you can rub the wire back and forth inside the sandpaper sandwich.
- The wire is stripped when you can see the shiny copper wire underneath.
- Troubleshooting Tip: It is a good idea to practice stripping the enamel insulation off a practice piece of wire. You may need some practice to get the pressure right so that the wire does not break while you sand it.
- Use the alligator clip leads to connect the coil to the battery. When current flows through the coil, the coil is energized and will behave as a magnet. When no current flows through the coil, the magnetic characteristics of the electromagnet disappear.
- Troubleshooting Tip: After connecting the coil to the battery, you can check that the electromagnet works by touching a paper clip to the coil. If the paper clip sticks, then the electromagnet is working. If the paper clip does not stick, then the electromagnet is not working. If this is the case, make sure that the alligator clips are connected to both the battery and the wire. One end of each lead should be clipped to one of the terminals of the battery (one lead to each terminal), and the other end of each of lead should be clipped to the stripped part of the magnet wire (one lead to each end of the wire). If the clip leads are connected correctly to the coil and battery but the electromagnet is still not working, then the problem may be that the magnet wire was not completely stripped. Try re-sanding the ends of the magnet wire until all of the reddish insulation is gone, then reconnect and retest the electromagnet.
- Touch the energized coil (lengthwise) to the paper clips, and then pull the coil away from the tray. See Figures 3 and 4.
Figure 3. After connecting the alligator clip leads to the battery and wire on the coil, the electromagnet will be energized. Lower the electromagnet into the container of paper clips so that the long part of the electromagnet touches the paper clips.
Figure 4. Once you have touched the electromagnet to the paper clips, lift the electromagnet up. Some of the paper clips will stick to the electromagnet. Move the electromagnet away from the container (so that the paper clips will not fall back into the container) and then disconnect the coil from the battery. - Once the coil is no longer over the container, disconnect the coil from the battery, and count how many paper clips the coil picked up. Record the number in your lab notebook. Organize your data in a table like Table 1.
- Repeat steps 4a to 4c four more times, for a total of five trials.
| Number of Turns on Coils | Number of Paper Clips Picked Up | |||||
| 1 | 2 | 3 | 4 | 5 | Average | |
| 50 | ||||||
| 100 | ||||||
| 150 | ||||||
| 200 | ||||||
No comments:
Post a Comment