Introduction
Civil engineering is the application of engineering principles to build large structures like roads, dams, or bridges. Usually civil engineering projects are for the public good, and provide an essential function. For example, bridges provide an essential corridor for traffic in parts of the world where large bodies of water separate an urban area. These traffic corridors are essential for business, commerce, and tourism.

The world famous Golden Gate Bridge in San Francisco.
The San Francisco Bay Area is home to one of the most famous bridges in the world, the Golden Gate Bridge. But just south-east of the Golden Gate is another bridge which holds great importance for trade and industry, the San Francisco-Oakland Bay Bridge, which connects the east bay cities of Oakland, Emeryville, and Berkeley to the city of San Francisco. But the dark secret of the Bay Bridge is that it also connects two major fault zones in Northern California, the San Andreas and Hayward Faults. In 1989 the Loma Prieta Earthquake (6.9) caused major damage to the Bay Bridge.
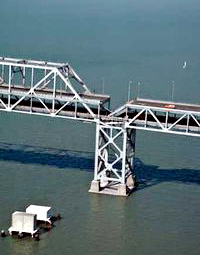
This aerial photo shows the section of the San Francisco-Oakland Bay Bridge that collapsed during the 1989 Loma Prieta Earthquake.
Now, many years later, the Oakland span of the Bay Bridge is being built with the latest seismic retrofit technology available. In this experiment you can investigate some of this technology and try your hand at designing the new Bay Bridge. You can choose your own designs and safety features before you test if your bridge can withstand an earthquake. How much shaking can your bridge design take?
Terms and Concepts
To do this type of experiment you should know what the following terms mean. Have an adult help you search the Internet, or take you to your local library to find out more!- civil engineering
- bridge types
- beam girder
- steel arch
- cantilever - truss
- suspension
- cable - stay
- safety features
- bearings
- ductile materials
- shock absorbers
- shear links
- earthquakes
- fault lines
- magnitude
- Which bridge designs are the strongest during an earthquake?
- What safety features can improve your design?
- How large of an earthquake can the best designs take without failing?
Bibliography
- Eduweb.com, n.d. "Bridge to Classroom: Engineering for Earthquakes," Educational Web Adventures (EduWeb) [Accessed April 29, 2009] http://eduweb.com/portfolio/bridgetoclassroom/engineeringfor.html
- Here is some background reading about the Loma Prieta Earthquake and the Bay Bridge from Wikipedia:
- Wikipedia contributors, 2006. "San Francisco-Oakland Bay Bridge, " Wikipedia, The Free Encyclopedia [Accessed December 15, 2006] http://en.wikipedia.org/w/index.php?title=San_Francisco-Oakland_Bay_Bridge
- Wikipedia contributors, 2006. "Loma Prieta earthquake," Wikipedia, The Free Encyclopedia [Accessed December 15, 2006] http://en.wikipedia.org/w/index.php?title=Loma_Prieta_earthquake
- Learn all about bridge building from this site at PBS based on the Building Big series:
- PBS, 2001. "Building Big: Bridge Basics," PBS Online, WGBH Educational Foundation. [Accessed December 15, 2006] http://www.pbs.org/wgbh/buildingbig/bridge/basics.html
- PBS, 2001. "Building Big: The Bridge Challenge," PBS Online, WGBH Educational Foundation. [Accessed December 15, 2006] http://www.pbs.org/wgbh/buildingbig/bridge/challenge/index.html
- PBS, 2001. "Building Big: About the Labs," PBS Online, WGBH Educational Foundation. [Accessed December 15, 2006] http://www.pbs.org/wgbh/buildingbig/lab/index.html
Materials and Equipment
- computer
- internet
- lab notebook
Experimental Procedure
- Do your background research and be sure you understand the basic bridge designs and terms above.
- Go to the Bridge to Classroom: Engineering for Earthquakes website and read through the opening Introduction page. Click on the tabs for more earthquake and bridge-building information, and then click "Continue".
- This experiment has a lot of trials and design options, so you will want to keep a good record of your choices. The best tool for this science project is a well-kept notebook! Draw and record your choices in your lab notebook to save your data. You can also use a screen capture to save images of your choices on your computer as you proceed.
Here is a sample data table to use for each design:List Bridge Type: List Safety Features: Span 1 - Steel Arch Shock Absorbers Span 2 - Suspension Shear Links Span 3 - Steel Arch - Click on the "Build Your Bridge" tab to begin your design experiments.
- Choose a type of bridge for each of the three segments of your new bridge. Place each segment by clicking on a bridge type and dragging it into place.
- Click on the "Add Safety Features" tab to add any safety features to reinforce your bridge design. Record your data, this can get complicated!
- Click on the "Test Your Bridge" tab to run the earthquake simulations. Choose BOTH a fault AND a magnitude from the list, then click the "Test It" button. The best strategy is to start by choosing the weakest earthquake and work your way up to higher magnitude earthquakes until your bridge design fails. Make a data table in your notebook to keep track of your successes and failures. Here is an example:
| Fault | Magnitude | Result |
| Hayward | 5.0 | pass |
| Hayward | 6.0 | pass |
| Hayward | 7.0 | fail |
| Hayward | 8.0 | fail |
| San Andreas | 5.0 | pass |
| San Andreas | 6.0 | pass |
| San Andreas | 7.0 | pass |
| San Andreas | 8.0 | fail |
- If you like, you can print your bridge design by clicking on the "Print Bridge" tab at the top of the page when you are done.
- Now incorporate what you have learned into your next bridge design, can you make an improvement? Remember for each design to keep careful records in your notebook in case you need to repeat any of your experiments!
- Summarize your results in a table or graph. Which bridge designs worked the best? Are there any safety features which made the design more earthquake proof? What were the weakest and strongest designs?
No comments:
Post a Comment