Introduction
The bearing capacity of soil is an important consideration in construction projects. Dams, bridge abutments, and temporary support structures (falsework) during construction are all examples of structures that can be supported by underlying soil.
How do engineers know how much weight soil can support? Is the amount of weight different for different types of soil? How does the size of the area in contact with the soil affect bearing capacity? How does the presence of water in the soil affect bearing capacity? Do you think sand or topsoil will have a higher bearing capacity? Why? These are the kinds of questions you can begin to answer with this project.
Terms and Concepts
To do this project, you should do research that enables you to understand the following terms and concepts:
- soil types,
- silt,
- clay,
- sand,
- loam.
More advanced students should also study:
- pressure.
Questions
- Which soil type do you think will support the most weight? Which soil type do you think will support the least weight? Why?
- Advanced: how does pressure exerted on soil change with contact area of the support structure, given a constant load?
Bibliography
- Wikipedia contributors, 2006. "Soil Mechanics," Wikipedia, The Free Encyclopedia [accessed June 19, 2006} http://en.wikipedia.org/w/index.php?title=Soil_mechanics&oldid=58795608.
- The SI unit for pressure is the pascal (Pa). For a definition of the pascal in base units, and a link to a calculator that converts between different units of pressure, see:
PEditor, 2000. "Pascal," Sizes, Inc. [accessed June 19, 2006] http://www.sizes.com/units/pascal.htm.
Materials and Equipment
To do this experiment you will need the following materials and equipment:
- large plastic tub (container for soil),
- 1-inch diameter dowel (length approx. equal to height of tub),
- ruler,
- marker,
- small pieces of wood or hardboard for platform and jig,
- drill with 1-inch spade bit or hole saw,
- file,
- 1/4-inch diameter dowel for legs of jig,
- different types of soil (play sand, mason's sand, topsoil, subsoil),
- shovel or garden trowel,
- weight for platform (e.g., bucket with water).
Experimental Procedure
- Do your background research and make sure that you are knowledgeable about the terms, concepts, and questions, above.
- You can make a simple experimental apparatus for measuring soil bearing capacity in a plastic tub. You'll need a piece of 1-inch diameter dowel, about as long as your tub is high. Mark off 1-cm increments along the length of the dowel, as shown in Figure 1.
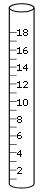
Figure 1. 1-inch diameter dowel, marked off in 1-cm increments (not to scale). - Make a platform from a small piece of wood or hardboard and attach it firmly to the top of the dowel with a wood screw and glue (Figure 2). It's a good idea to drill a pilot hole for the wood screw, so the dowel doesn't split. Your platform should be large enough to support the weight you'll be using.
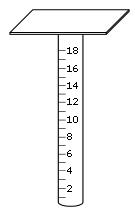
Figure 2. Dowel with platform attached (not to scale). - Make a jig to hold the dowel vertically over the soil surface (Figure 3). The dowel should be able to slide freely, so the hole needs to be slightly larger than the diameter of the dowel. You can drill it with a 1-inch spade bit, or a 1-inch hole saw, and then file out the hole to enlarge it enough for the dowel to slide freely. Make the legs from thinner dowels, and glue them to the bottom. You'll push these into the soil, so they need to be a bit longer than your tub is high (tall enough to hold the dowel upright).

Figure 3. Jig for holding the dowel upright. The hole should be slightly larger than the dowel, allowing it to slide freely, but still supporting it. The legs should reach the bottom of the tub, and leave the platform high enough above the soil to keep the dowel from tipping over (not to scale). - Fill the plastic tub with the sand or soil you want to test.
- Push the legs of the jig firmly down into the soil, and set the dowel so that it rests on the surface of the soil (see Figure 4).
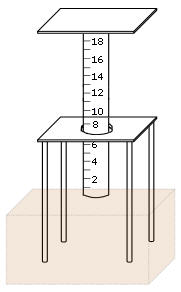
Figure 4. The dowel supported in the jig. Push the legs of the jig firmly down into the soil, and set the dowel so that it rests on the surface of the soil (not to scale). - Load the platform with weight (e.g., container + 500 ml water), and record how far the dowel penetrates into the soil. Keep track of the results in your lab notebook.
- Add an increment of weight and record how far the dowel penetrates into the soil. Repeat until the dowel does not penetrate further. Repeat the measurement at least three times, in different locations in the tub. Calculate the average penetration depth for each weight and soil type tested.
- For each soil type, make a graph of the penetration depth vs. weight.
- What happens to the soil underneath the dowel? If you add more weight to the dowel, does it descend by the same amount for each additional (equal) increment in weight?
- See the Experimental Procedure section, in particular, steps 7, 9, and 10.
- More advanced students can compute the pressure applied to the soil by the weighted dowel. Pressure is the force per unit area. The SI unit for pressure is the pascal (Pa), which is newtons per square meter. Calculate the pressure on the dowel for each weight tested, and make a graph of soil penetration depth vs. pressure.
No comments:
Post a Comment