Introduction
When designing or building a structure, the most important factor is stability. If the structure is not stable, it is not safe because it can collapse and create a very dangerous situation for people in and around the structure. A civil engineer must always keep in mind if the structure they design can withstand potentially damaging forces that can push or pull on the structure in unexpected ways. By thinking about these unexpected forces beforehand, a civil engineer can avoid potentially dangerous situations for people who will use the structures that they design.
One example of a potential problem for the stability of a structure is a high speed wind. A high speed wind pushes on a structure from the side, and adds an unexpected lateral force which can collapse a structure. Windy conditions may be extreme and seasonal (like blizzards, hurricanes, tornadoes, or monsoons) or daily and predictable (like strong offshore winds at a shoreline beach park). In either case, these high winds can be powerful enough to cause damage to structures, putting people who happen to be around them in danger.
On the other hand, sometimes a structure can be helpful in a windy area by providing a welcome shelter from gusts of wind. You may have seen wall or fence structures at a picnic area or boardwalk that shield people from windy conditions. An effective "windbreak" can act as a screen and provide enough shelter to have a delightful picnic even on the windiest day.
One smart science fair student, Erica David, has developed fence designs to shield Wyoming homes, ranches, and highways from high speed winds during winter blizzards (Clarke Fox, 2007; Sohn, 2006). Her inspiration for the design was to protect her family's livestock during the winter. Her designs have led to several winning science fair projects, and even a $5000 award from the Intel International Science and Engineering Fair (ISEF)!

Erica's fence designs helped her to solve a "windy" problem, and earn top awards at ISEF (Clarke Fox, 2007; Sohn, 2006).
How does a safety conscious civil engineer like Erica design a structure for a windy location in a public space? Once an engineer knows that wind is an issue, they can incorporate that into the design process. An engineer can make models of different designs and test their stability in high speed winds. Then the engineer can use the design to solve a "windy" problem, just like Erica David did!
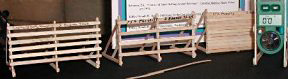
Here are Erica's fence design models that she built and tested for her science fair project (Clarke Fox, 2007; Sohn, 2006).
In this experiment you will play the civil engineer and design a wall or fence to withstand lateral wind forces. You will design and build several scale-model structures and test them for stability in windy conditions. Then you can choose the best design. You may even be able to use your design to solve a "windy" problem area at your local park or school.
Terms and Concepts
To do this type of experiment you should know what the following terms mean. Have an adult help you search the Internet, or take you to your local library to find out more!- wind
- force
- windbreak
- structure
- stability
- design
- scale
Questions
- How will wind affect a wall or fence structure?
- Can altering the design of a wall or fence make it more stable in the wind?
- Can walls or fences be used to shield an area from windy conditions?
Bibliography
- The inspiration for this project came from a series of projects developed by Erica David of Pinedale High School in Wyoming. Erica has designed fencing used as wind traps for snowy conditions in Wyoming, and has developed this idea into science fair projects 5 years in a row! Last year she even won $5000 at the Intel International Science and Engineering Fair (ISEF)!
Materials and Equipment
- laboratory notebook with graph paper
- a fan with high speed setting
- foam-core
- masking tape
- paper plates
- hot glue gun and glue sticks
- utility knife (adult supervision required while using the utility knife)
- other materials as needed for your wall and fence designs
- screen or mesh material
- wire or string
- cardboard or poster board for lattice-work
Experimental Procedure
- The first step is to design your fencing. Use a pencil and a laboratory notebook with graph paper to sketch out your designs. Draw the designs to scale by making one square on the graph paper equal to one centimeter (or other convenient measurement). Make the outer dimensions of each wall design the same as a control, but change elements of the design on the interior. Indicate on your design the materials you will use to build it. Here are two simple design ideas using a solid panel (A) and evenly spaced vertical slats (B):
- Need more ideas for your designs? Here are more ideas to try:
- replace the solid foam core panel with a mesh or screen material
- cut out some holes in the foam core panel
- change the spacing, number, or width of the slats
- change the angle of the slats (parallel, perpendicular, or at an angle in-between)
- use horizontal instead of vertical slats
- make a lattice work design
- The next step is to build your designs using the indicated materials. Cut out the pieces and assemble using a hot glue gun.
- Glue the base of each wall to the bottom of a paper plate as a base support.
- Set up the fan and measure out from the fan a distance of about 3 meters. Mark this area with masking tape, it will be where you place your walls for testing. Please note that you may need to optimize the setting of the fan (high or medium) and the distance you place your walls (1-5 meters), depending upon what type of fan you have and the variable designs used in your experiment. The important thing is that once you settle on a placement and a fan setting, DO NOT change these during your experiment! They need to be kept constant as a control.
- Place a wall design in the marked-off area and turn the fan on the highest setting.
- Test each wall design the same way. Write down what happens to each wall in your laboratory notebook. Does the wall fall over (Y/N)? Does the wall begin to tip (Y/N)? Does the wall shield the area behind it from the wind (Y/N)?
- How did your designs fare? Which types of designs will work best in a windy area? You should develop a scale to rank the walls in order of best to worst based upon your results. Then you can think about real world applications for your designs. Can you recommend a particular design to help solve a wind problem at your home, a local park, or school?
No comments:
Post a Comment