Introduction

Watch a video of this earthquake investigation, produced by DragonflyTV and presented by pbskidsgo.org.
Have you ever seen someone cover a boiling pot with a plate, rather than with a lid? Did the plate start to rattle and move around a bit from the steam pressure below it? A similar process is happening all the time to the Earth. Heat deep inside the Earth causes tectonic plates at the surface to move. Slow movement of one plate past another over many years is called fault creep. Sudden movement of the plates is called an earthquake. Earthquakes happen when the two plates get "stuck" for a time as they are sliding past each other, and then suddenly they become "unstuck," releasing energy. It's similar to a window that's stuck. You lift and lift to try and open the window, and then finally there is sudden, fast movement.
Did you know you can see evidence of fault creep and earthquakes all around the San Francisco Bay area? Watch this DragonflyTV video and follow Claire and Nisha as they discover signs of fault creep and earthquakes in the roads, buildings, and ground all around their neighborhood.
When an earthquake occurs there is a sudden release of energy in the form of waves, called seismic waves. There are two main types of seismic waves: body waves, which can travel through the inner layers of the earth, and surface waves, which can only travel on the surface. Body waves are the fastest and have the highest frequency.
The first type of body wave is called the primary or P-wave. It pushes and pulls the solid rock or liquid matter that it is moving through and people feel it as back-and-forth or side-to-side motion. If you imagine two people holding the ends of a stretched-out slinky, with a piece of tape in the middle, and then one person squeezes some coils together on one end and lets it go, you will see a longitudinal wave go down the length of the slinky and the piece of tape will get pushed forward, and then come back to its starting position. This is how a P-wave pushes a particle of matter and creates motion (shown in Figure 1).
Figure 1. This animation shows the particle motion created by a P-wave. (Michigan Technical University, 2007.)
The second type of body wave that you feel in an earthquake is called the secondary or S-wave. S-waves cannot move through liquids, only through solid rock. They move rock particles perpendicular to the direction the wave is traveling in. Don't miss wave animations, referenced in the Bibliography, where you can see body waves and surface waves in action!
In this science fair project you will focus on the pushing and pulling P-waves. You will see what happens when the waves shake houses that are sitting on different types of soil models: bedrock, gravel, alluvium, and sand. Engineers and seismologists create special shake hazard maps, which show where these different soil types are located. The type of soil affects how much shaking a house experiences. Soft soils amplify ground shaking more than hard soils do. Take a look at these seisomograms (pictures of earthquake signals) from the 1989 Loma Prieta earthquake. The graph on the left shows how much ground motion was experienced on soft sand or landfill, while the graph on the right shows how much ground motion was experienced on hard bedrock, over the same time period less than a quarter of a mile away.
Figure 2. These graphs show recorded ground motion in San Francisco, California, from two different locations during the 1989 Loma Prieta earthquake. The motion on the left is from a location at which the soil type is sand or landfill, while the signal on the right is from a location at which the soil type is bedrock. (Exploratorium, n.d.)
In addition to being soft in nature, sand or landfill can also undergo a liquefaction process where it changes from a wet solid into a dense liquid, which further amplifies shaking.
Now it is time to build some sweet and sticky test houses, a shake table to imitate P-waves, and some soil models on which to test the houses. When you shake the table and simulate P-waves, which types of soil do you think will make your test houses crumble the most?
Terms and Concepts
To do this science fair project, you should do research so that you understand the following terms and concepts:
- Tectonic plate
- Fault creep
- Earthquake
- Energy
- Seismic wave
- Body wave
- Surface wave
- Frequency
- Primary wave (P-wave)
- Longitudinal wave
- Secondary wave (S-wave)
- Bedrock
- Gravel
- Alluvium
- Sand
- Seismologist
- Amplify
- Liquefaction
- Model
Questions
- What causes an earthquake?
- What kinds of motion are created by each of the seismic waves?
- What are the differences between bedrock, gravel, alluvium, and sand?
- If you are building a new home in an earthquake-prone area, why is it important to know the type of soil on which you are building?
Bibliography
This source displays animations of body and surfaces waves:
- Michigan Technical University. (2007). What is Seismology and What Are Seismic Waves? UPSeis, an Educational Site for Budding Seismologists.Retrieved May 5, 2008, from http://www.geo.mtu.edu/UPSeis/waves.html
This source displays an interactive map for the San Francisco Bay Area, in which you can see the locations of different soil conditions and their expected shaking hazard (bedrock is in red, alluvium is in green, gravel is in yellow, and sand or landfill is in red):
- U.S. Geological Survey. (2009, June 26). Soil Type and Shaking Hazard in the San Francisco Bay Area. Retrieved September 9, 2009, from http://earthquake.usgs.gov/regional/nca/soiltype/
This source describes the liquefaction process:
- Exploratorium. (2009). Faultline. Retrieved September 9, 2009, from http://www.exploratorium.edu/faultline/damage/building.html
This source describes alternative materials that you can use to make your test houses if you decide you want to test wooden or steel frame house models, rather than models made from simulated masonry:
- MCREER Information Service. (2009). Building Structure Exercise. Retrieved September 9, 2009, from http://mceer.buffalo.edu/infoservice/Education/structureLessonPlan.asp
- The Exploratorium. (1998). Outrageous Ooze. Retrieved September 9, 2009, from http://www.exploratorium.edu/science_explorer/ooze.html
This science fair project was inspired by this DragonflyTV Podcast:
Materials and Equipment
- To build your shake table, you will need:
- Packing tape
- Coffee can lid, or any flat plastic lid with approximately 3/8" lip that can fit under the shake table tray
- Marbles, or any small balls of the same size (1-2 dozen)
- Shallow box, like the lid on a board game box
- Tray (1); any shallow, large tray that is a few inches smaller than your game box lid, but that will snugly hold the trays that will hold your test soil and houses (see the To prepare your soil trays, you will need materials list, below); consider StyrofoamTM take-out containers.
- To build your test houses, you will need:
- Butcher paper or newspaper
- Damp cloth to wipe your hands on
- Sugar cubes (approximately 600)
- Bowl
- Spoon
- Peanut butter (32 oz.), or a substitute, such as soy butter if you are allergic to peanuts. Ask your parent or allergist what a good substitute is for you.
- Scissors
- To prepare your soil trays, you will need:
- Play-Doh® (approximately 5-6 regular-sized canisters), or homemade dough
Note: If you are making homemade dough, you will need:- Flour (3 ½ cups)
- Salt (½ cup)
- Oil (3 tablespoons)
- Water (2 cups, boiling)
- Grape-Nuts cereal (1 box)
- Cornstarch (1 box)
- Water (approximately 4 cups)
- Bowls (2); for mixing Grape-Nuts with water, and cornstarch with water
- Spoon
- Fork
- A handful of dried beans, marbles, or coins to simulate the weight of your sugar and peanut butter house as you check the consistency of your cornstarch, and a small container in which to put them; the container should be able to fit into your cornstarch mixing bowl.
- Trays (4); any shallow nesting trays that are bigger than your test houses, but will fit snugly inside your shake table tray, such as StyrofoamTM take-out containers, the plastic lids from frozen dinners, or packaging for fresh fruit; see Figure 5 for an example.
- Play-Doh® (approximately 5-6 regular-sized canisters), or homemade dough
- To test your houses, you will need:
- Stopwatch
- Lab notebook
- Camera (optional)
Experimental Procedure
Building Your Shake Table
- A shake table is used to create motion with which you can test your sugar cube houses' response to shaking. For your shake table, you will try to imitate the pushing-and-pulling P-waves. Figure 3 shows the components of the shake table and how it is assembled.

Figure 3. This is how to assemble the shake table. - Cut off a strip of the packing tape and form it into a loop with the sticky part on the outside.
- Attach the tape to the top of the coffee can lid and the bottom of one of the trays so that the top of the lid is stuck to the bottom of the tray.
- Dump the marbles into the game box lid.
- Set the tray with its attached coffee lid so that it is resting on top of the marbles. The lip of the lid should be resting on the marbles. This tray will hold your other trays as you perform each trial. Now you're ready to shake the game box side to side to create your P-waves. Continue with the rest of the steps first.
Building Your Test Houses
- OK, this will be messy, but fun! You can build any shape of houses that you want, but keep in mind that you will need to build 12 of them, they should all be exactly the same, and they must fit inside your trays.
- First, spread out some butcher paper or newspaper to make cleanup a little easier. Keep a cloth or bowl of water around to clean your hands if they get super gooey during the building. You should also make some clear space on the table or another counter for your completed houses.
- Dump out some of your sugar cubes into a pile on the butcher paper or newspaper. You have a lot of sugar cubes and a lot of houses to build, so don't dump them all out at once.
- Scoop out some peanut butter (or your substitute) into a bowl and put it next to the sugar cubes.
- Now start dipping sides of the sugar cubes into the peanut butter and sticking them together. The sugar cubes are like little white bricks, and the peanut butter is like mortar. Build your first house on a section of paper that you can cut out when you are finished. Continue until you have created your first test house. Don't eat more than you build!
- Cut out the paper around the test house and set it aside until you're ready to test.
- Repeat steps 3-6 until you have 12 test houses that are built exactly the same and are all on their own pieces of butcher paper.
- Below are four example test houses for the first experimental trial of each soil type.

Figure 4. Here are four example test houses for the first experimental trial.
Preparing Your Soil Trays
- You will be preparing four trays for testing models of four different soil types: bedrock, gravel, alluvium, and sand.
- To prepare the bedrock model, fill one tray about half full of Play-Doh (either store-bought or homemade).
- To make homemade dough, mix the flour and salt together. Have an adult help you slowly add the oil and hot water as you stir. The water is very hot so be careful! Keep stirring until the mixture is cool enough to knead (press and squeeze and fold on a hard, lightly floured surface). Knead the dough well and then place it in the tray.
- To prepare the gravel model, pour dry Grape-Nuts cereal into another tray until it is about half full.
- To prepare the alluvium model, mix about 2-3 cups of dry Grape-Nuts cereal with about 1 cup of water and pour the mixture into another tray until it is about half full.
- To prepare the sand model, you will need a ratio of about two parts cornstarch to one part water. Put 3 cups of cornstarch in a bowl. Slowly add about 1 ½ cups of water to the cornstarch, mixing as you go with a fork or with your hands. You will know that you have the right consistency of the cornstarch mixture when it is firm enough to support a test house, but still liquid enough that you can press your finger slowly down into it. Another clue is that when you slowly press your finger down into it and then shake the mixture from side to side, it will kind of feel like your finger is in a liquid. If the mixture is too thin and runny, and the house sinks way into it, add a little more cornstarch. If the mixture is too hard, like the bedrock Play Doh model, and you can't press your finger into it, or it doesn't quiver and feel a bit like a liquid when you shake it, add a little more water. Once you get the consistency just right, pour your cornstarch mixture into another tray until it is about half full. Figure 5 shows an example of how your prepared trays should look. Read the additional notes below before you begin making your cornstarch mixture.
- To test whether the cornstarch mixture will support a test house, put a small container on top of the mixture in your mixing bowl and fill it with something like dried beans, marbles, or coins-something that weighs about the same as one of your sugar and peanut butter houses. See if the container sinks way down into the cornstarch mixture, or if it rests mostly on top. (You want it to sink down just a little bit-not to the bottom of the bowl.) By using a container and small weights, you can test the cornstarch consistency without potentially ruining a sugar and peanut butter house before you are ready to run your experiment.
- Note: You are not using real sand for this model because you are trying to model the liquefaction process—the process in which sand changes from a solid to a liquid when it is shaken in an earthquake. With your simple, hand-powered shake table, you cannot shake real sand fast enough to achieve liquefaction; so instead, a cornstarch mixture is used, which can support a test house when there is no shaking going on, but that behaves more like a liquid under the influence of hand-powered shaking.
- The cornstarch mixture has very unusual properties—sometimes it acts like a liquid, sometimes it acts like a solid. The faster you stir it, the more it acts like a solid! This is why you need to mix it up slowly with a fork or with your hands, rather than rapidly with a spoon. You will notice that the mixture feels very strange. You can read more about its amazing properties in the Bibliography.
- Important Cleanup Notes: Do not ever pour any large amount of cornstarch and water mixture down the drain. It will clog it up! Instead, dump any extra mixture into a large plastic garbage bag and throw it away in the trash.
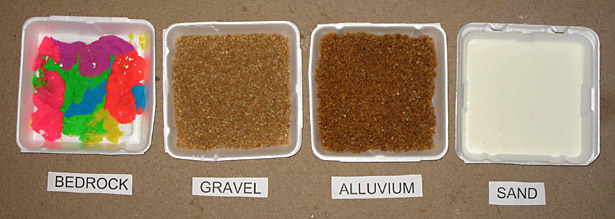
Figure 5. These prepared trays hold models of four different soil types. - Create a data table in your lab notebook to record the results of your shaking tests, like the one below:
| Number of Broken or Fallen Walls | Bedrock | Gravel | Alluvium | Sand |
|---|---|---|---|---|
| Trial 1 | ||||
| Trial 2 | ||||
| Trial 3 | ||||
| Sum of trials | ||||
| Average of trials |
Testing Your Shake Houses
- Now it's time to try this out! You finally get to shake your test houses on the four different soils.
- Begin trial 1 with bedrock. Slide a test house and its paper gently onto the middle of the bedrock tray. Press the house down slightly into the test soil so that there is good contact between the test soil and the test house, and the test house does not slide around on top of the test soil during testing.
- Place the prepared bedrock tray into the empty shake table tray. The bedrock tray should "nest" snugly into the empty tray in the shake table.
- Have a helper time you shaking the box lid for 20 seconds. When you're ready to start, have the helper say, "Go!" and start a stopwatch.
- Now shake or vibrate the game box lid from side to side very rapidly until 20 seconds have passed and your helper says, "Stop!". During the shaking, your hands should move from side to side no more than an inch or two, and you should avoid letting the tray bump the sides of the game box.
- Record the number of broken or fallen walls in your data table. In the Figure 6 example, below, the test house in alluvium resulted in three fallen walls, so the number "3" would be recorded in the data table.
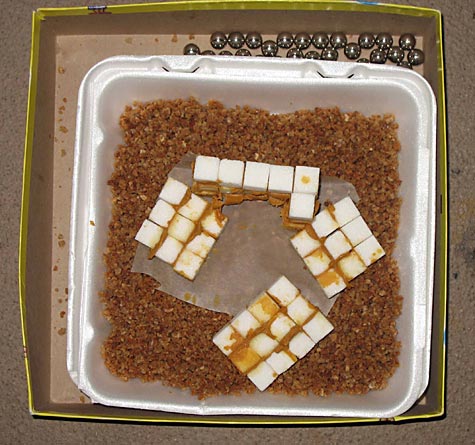
Figure 6. This is a test house in alluvium at the end of shaking, which shows three fallen walls. - Take photographs for your display board, if desired.
- Remove the prepared tray and the broken test house.
- Repeat steps a-e for the three remaining soil types: gravel, alluvium, and sand. Be sure to record your results in your data table after each shaking test.
- Repeat "Testing Your Shake Houses" steps 1-4 for two additional trials per soil type so that all 12 houses are tested.Which soil type caused your test houses to break apart the most? Which soil type caused your test houses to break apart the least? On which type of soil might it be safest to build a home if you live in an earthquake-prone city?
No comments:
Post a Comment