Introduction
Today, magnetic disk drives are used to store and retrieve information for many different applications. Digital video recorders (DVRs), MP3 players, cell phones, and gaming systems are all examples of popular products that use a disk drive to store and retrieve information. Some other applications that you may not be familiar with are global positioning systems (GPS), banking systems, and cars.
How are all these different kinds of information stored on magnetic disk drives? How much data can fit in a given amount of space on a disk? How is data erased from a disk? This project will help you answer these questions as you learn how magnetic materials are used to store information.
Information like words, music, pictures, or movies is translated into a format that can be saved onto various permanent storage devices, like a magnetic disk drive. This translation is called digitization, which means that the information is converted into a stream of numbers. The smallest unit for digital information is called a bit. A bit can be either 0 or 1, that's it. By stringing together a series of bits, larger numbers can be represented. For example, a byte is a sequence of 8 bits. A byte can encode 28 (= 256) unique values.
Letters, numbers, and other symbols for printed text are digitized using a standard code, called ASCII (ASCII is an acronym for American Standard Code for Information Interchange). Using the ASCII table, what sequence of bits would correspond to the word "digitize?"
In this project, you will digitize a short piece of text (e.g., the name of your favorite band) using the ASCII representation of the text. Next, you will use bar magnets to represent the individual bits of the digitized text. The orientation of the magnet will determine whether it represents a 0 or a 1. You'll see how close together your magnets can be packed while still preserving your stored information. Finally, you'll see how easily you can erase your stored information with a permanent magnet.
Terms and Concepts
To do this project, you should do research that enables you to understand the following terms and concepts:
- Bit
- Byte
- ASCII
Questions
- Before MP3 players and DVRs, what was used to store and retrieve music and video?
- What are other examples of storage and retrieval methods or systems?
- Why do you think disk drives devices like iPODs and DVRs have replaced tape-based devices like Walkmans and VCRs?
Materials and Equipment
A project kit containing most of the items needed for this science project is available for purchase from AquaPhoenix Education. Alternatively, you can gather the materials yourself using this shopping list:
- A print-out of the ASCII code and binary code of the alphabet
- Bar magnets, 1-inch (24); North and South poles must be marked
- Horseshoe magnet, large (1); a 8-inch magnet is recommended
- Paper
- Tape; scotch tape works well but any kind of tape will do.
- Ruler or measuring tape
- Lab notebook
Experimental Procedure
In this experiment, you will digitize a short piece of text (any 3-letter name or word you want) using the ASCII representation of the text. Next, you will use bar magnets to represent the individual bits of the digitized text. The orientation of the magnet will determine whether it represents a 0 or a 1. You will see how close together your magnets can be packed while still preserving your stored information. Finally, you will see how easily you can erase your stored information with a permanent magnet.
- You will need a three letter word, name, or acronym to digitize. It can be anything you want.
- Make a table, in your lab notebook, to translate your chosen word or phrase into the binary ASCII code.
| J | e | m |
| 0100 1010 | 0110 0101 | 0110 1101 |
- Now use individual bar magnets to represent each bit of the coded word.
- Tape several pieces of paper together lengthwise. Using your ruler to measure, draw 24 rectangles. Each rectangle should be 2 inches long (left to right) and 1 inch wide (up and down).
- We will say that a magnet with its N pole facing right is a 1, and a magnet with its N pole facing left is a 0 as shown below in Figure 1. (To make your code easier to see, you may want to color the N half of each magnet.) Place one magnet in each rectangle on your paper, arranging them according to the binary code for your word or phrase.
- What is the information density of your recording? How many bits per square inch? Record your calculation in your lab notebook. Just for comparison, a 1990 hard disk could store 1 billion (1,000,000,000) bits per square inch, and a 2006 hard disk can store 100 billion (100,000,000,000) bits per square inch.
- Square inches are calculated by multiplying the number of rectangles on your paper by the length of each rectangle by the width of the each rectangle. For example, 24 rectangles x 2 inches length x 1 inch width = 48 square inches.
- Every 1/0 is a bit. Since every 1/0 is represented by a magnet you can count the total number of magnets in order to calculate the number of bits.
- Bits per square inch is the total number of bits divided by the total square inches.
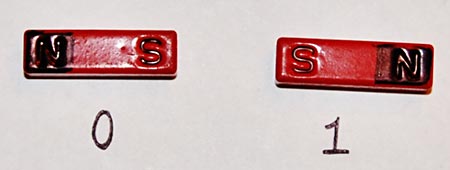
Figure 1. For this project, we will call a magnet where the N is on the right a "0" and a magnet where the N is on the left a "1".
- Gently jiggle your paper. What happens to the arrangement? Are some of the magnets attracted (or repelled) by their neighbors? Did something like this happen to your magnets (see Figure 2)?

Figure 2. Neighboring bar magnets with opposite polarity are attracted to one another when paper is jiggled.
- If the magnetic material on a recording surface could move around like your bar magnets, how do you think this would affect the durability of the recording?
- Create a new set of rectangles, on paper, for your magnets. Keep the width 1 inch and decrease the length of the rectangle to 1 ¾ inches. What is the information density now? Do the magnets interact with their neighbors (without you jiggling the paper) or stay separated?
- Repeat step 7 with increasingly smaller length rectangles. Each time, decrease the length of the rectangle by ¼ inch and record your calculations and observations in your lab notebook. How small can your squares be without the magnets interacting with their neighbors? What is the highest recording density (in bits per square inch) you can achieve?
- Once you have found the highest recording density possible with your bar magnets, arrange the magnets on your paper again using that rectangle size. Take the horseshoe magnet and, holding it a foot above the paper (measure with the ruler), pass it over the bar magnets. Did any of the bar magnets move?
- If the bar magnets did not move, lower the horseshoe magnet slightly and try again. At what height does the horseshoe magnet move the bar magnets?
- If the bar magnets did move, raise the horseshoe magnet slightly and try again. At what height does the horseshoe magnet first stop moving the bar magnets?
- Record your observations in your lab notebook.
- What does this tell you about erasing data stored on magnetic recording media? Would it be okay to put a strong magnet next to an iPad, computer, or cell phone?
No comments:
Post a Comment