Wednesday 9 December 2015

Building and Construction

How Engineers Can Adapt Infrastructure Design for a Changing Climate
Mud flows on Oct. 15, 2015 shut a 30-mile stretch of I-5.
Now in its fourth year of severe drought, California is juggling with knives. Groundwater levels are falling. Seawater intrusion threatens drinking water supplies. Sinking land and erosion expose structural vulnerabilities. But drought alone does not cause infrastructure failure. Factor in heavy rainfalls or an earthquake, and that precarious knife-juggling act could result in some serious consequences.

(Read “Hardening the Infrastructure: Flood Management Controls.”)

California officials have put in place mandatory water restrictions and groundwater supplies are being recharged with clean-treated waste water in southern parts of the state, but these efforts represent the proverbial drop in a bucket in mitigating drought risk and its impact on infrastructure.

The state’s volatile situation illustrates the challenges confronting civil engineers when planning infrastructure for drought and other extremes in the face of a changing climate. The primary challenge to the engineering community is developing strategies for the uncertainty that comes with projecting future climate conditions.

Cracks in the Facade
Prolonged periods of drought pose many threats, perhaps the biggest of which is the stability of levee systems. Droughts produce a series of weakening mechanisms that negatively impact the integrity of such earthen structures.

A leading source of stress on levees is land subsidence. Drought leads to increased extraction of groundwater from aquifers, which creates subsurface movement. Over time the land sinks or subsides.

Extensive groundwater pumping has exacerbated existing land subsidence in parts of the state, especially the Delta, says Farshid Vahedifard, an assistant professor at Mississippi State University. The geotechnical engineering specialist researches climate change and its impact on critical infrastructure performance. A climbing rate of soil organic carbon (SOC) decomposition due to drought also is contributing to land subsidence in the Delta.

Recent results from a monitoring program revealed that drought-accelerated land subsidence has reached as much as 2 inches per month in some places, several times greater than pre-drought subsidence rates.

Additional drought-induced stressors on levees include soil strength reduction, desiccation cracking, erosion, fissuring and soil softening, and increased SOC oxidation. In California, such conditions compound the stresses on levee systems that already are endangered, says Vahedifard.

High Hazard

The California Department of Water Resources evaluated the state’s levees in 2011 before the start of the current drought. The agency classified 51% and 55% of urban and non-urban levies, respectively, as high hazard. The designation indicates that levees are in danger of failing during an earthquake or flood.

The study results imply that functionality of the aging structures “will continue to decrease unless strategic actions are taken to implement some level of maintenance and rehabilitation approaches,” Vahedifard says.

That could spell disaster for the 13,000-plus miles of levees and their various functions should heavy rainfall or storm surges occur, a phenomenon that is not uncommon at the end of a drought. The Delta, for example, directs drinking water to 23 million people and irrigation water for several million acres of agriculture. Levees throughout most of the Delta downstream of Sacramento primarily protect land at or below sea level and often serve to hold water back.

Catastrophic failure of these non-urban levees could inundate land that has subsided below sea level “drawing in seawater and consequently contaminating the water supply,” Vahedifard says.
In comparison to the Delta’s levees, urban levees protect densely populated areas in the Central Valley and Northern California from flooding. According to Vahedifard, desiccation cracking “can be of greater consequence for the integrity of these intermittently loaded levees that may become completely dry during drought.”


Effects on Related infrastructure

Drought conditions impact more than levees. They can threaten any infrastructure interfacing with soil, including slopes, embankments, roads, bridges, building foundations and pipelines.
Land subsidence, for instance, puts utility connections at risk as buildings sink, says Vincent Lee, associate principal at the international engineering firm Arup. Canals and sewers are examples of utility conduits that require gravity to enable them to function properly, Lee says. “Sewer or drainage pipes tilting in the wrong direction would result in conveyance issues as water can’t flow uphill,” he says.

In California, two recent events demonstrate what heavy rains do to drought-stricken, soil-related infrastructure. An intense October storm with hail unleashed 300,000 cubic yards of mud and debris onto Interstate 5 and surrounding roadways north of Los Angeles. The mudslide trapped a few hundred vehicles.

In July, a bridge collapsed on Interstate 10 in the California desert between Los Angeles and Phoenix after flash flooding eroded the ground beneath the bridge supports. Repair of that magnitude can typically take 18 months; design engineers and construction crews finished the work in two months for $5 million.

To further complicate matters, the El NiƱo weather phenomenon is expected to hit California in early 2016 with the possibility of heavy rainfall and storm surges, adding stress to already vulnerable infrastructure.
In addition to heavy rain, extreme heat often accompanies drought. In the Southwest U.S. and Texas, extreme heat has caused railroad rails to bend, Arup’s Lee says. This increases the risk of train derailments. Meanwhile, decreasing water levels in rivers, channels and waterways can impact shipping and transportation routes. Power plants that rely on water for cooling may have to decrease their generation output or experience shutdowns. Low water levels on the Missouri River a decade ago impacted power generation across the Midwest.

Designing for Uncertainty

California’s drought-plagued infrastructure serves as a microcosm of the challenges that civil engineers face when adapting and designing critical infrastructure to be resilient to a changing climate.

Engineers typically plan and design infrastructure according to historic weather records. With the changing climate, however, “the assumption that things are random but the same — that is, they are stationary — might not be valid,” says Bilal Ayyub, professor of civil and environmental engineering and the director of the Center for Technology and Systems Management at the University of Maryland. “We are dealing with a higher level of uncertainty in predicting extreme conditions compared to what we have done in the past.”

That uncertainty relates to the location, timing and magnitude of the changes over the lifetime of infrastructure. To help engineers navigate these unknowns, the American Society of Civil Engineers (ASCE) produced the white paper “Adapting Infrastructure and Civil Engineering Practice to a Changing Climate.”

Written by ASCE’s Committee on Adaptation to a Changing Climate, the paper identifies three types of information engineers need to effectively address climate change impacts: action-oriented knowledge, fundamental knowledge and analytical tools.
Civil engineers require action-oriented climate change information that characterizes climate projections over the next few decades. Also necessary is understanding interdependencies within and between the various components of civil infrastructure.

Fundamental knowledge involves re-examining many civil engineering design standards and performance metrics. That means everything from identifying limits in current designs and materials for extreme loads to evaluating the effects of changing demands on infrastructure vulnerabilities.

Analytical methods are necessary to integrate variance into planning and design, measure the effectiveness of infrastructure adaptation and define and evaluate the economic implications of infrastructure vulnerabilities.

Ayyub also points out that designing with climate change in mind necessitates a risk-management strategy that allows a system to be updated as conditions change. This framework includes monitoring various infrastructure components with sensors to detect early warnings of stress, says Ayyub, a lead author on the ASCE paper. Performance data collected over the years can yield insights into a system’s performance under changing conditions.
In addition to the paper, ASCE’s Infrastructure Resilience Division generated a list of potential initiatives this past summer that address how to implement resilience concepts for infrastructure into civil engineering practice.

One roadblock awaiting engineers is that the codes used to design infrastructure don’t necessarily consider drought. “When the engineering community built all of this infrastructure in the 1940s and ’50s, potential impacts of droughts were unknown,” says Amir Agha Kouchak, a hydrologist and assistant professor at the University of California, Irvine.

Updating the codes is a complicated process that requires research not only to understand the mechanisms but also develop methods and frameworks to factor drought conditions into designs.
“There are infinitely potential ways to make a structure stable, but those ideas should be explored and calculated by the greater scientific community,” Agha Kouchak says.


Putting Infrastructure to the Test

Research, development and demonstration will help civil engineers address the impact of climate change on the infrastructure they design. In his work on quantitatively assessing the resilience and vulnerability of critical infrastructure to extreme events under a changing climate, Mississippi State’s Vahedifard is collaborating with hydrologists and climate scientists to bridge the gap between climate science and engineering practice.

One part of his research assesses the thermo-hydro-mechanical impacts of climate change on the performance of and soil-structure interaction in critical earth structures. In another part, Vahedifard and his colleagues are working to develop tangible design and risk management approaches for critical infrastructure.

The research team currently is evaluating the effects of California’s drought on soil strength and the structural integrity of the state’s levee systems, as well as the effects of increased rainfall intensity on landslide activities in Seattle, Wash.

At UC Irvine’s Center for Hydrology & Remote Sensing, Agha Kouchak has developed the Global Integrated Drought Monitoring and Prediction System (GIDMaPS). The system relies on NASA data products to generate meteorological, agricultural and agro-meteorological drought information. Agha Kouchak and his team will soon unveil a fourth category based on relative humidity. He expects that to help detect drought onset earlier than other indicators.

Used for seasonal analysis, the statistical drought prediction model estimates how drought will change in the next 4 to 6 months. “We don’t go any farther out into the future because drought prediction is very challenging,” Agha Kouchak says. He and the other researchers also are developing a California-specific model.
Solutions for a more resilient infrastructure are starting to emerge outside the lab. “We need a systematic approach and understanding of how one system affects another,” Lee says. “Engineering solutions need to be tied to an elegant and integrated design.”

Lee cites the proposed reconfiguration of the 51-mile Los Angeles River corridor. Project planners and engineers seek to integrate design and infrastructure for a “more aesthetic solution that benefits the community while still functioning from an engineering standpoint,” Lee says.

The Los Angeles River Revitalization Corp. has commissioned architect Frank Gehry and a team of experts to analyze data and recommend river interventions and capital improvements “based on design storm impacts and process methodology.”

The initial study, which involves public engagement, will address factors such as flood management, infrastructure resilience, recreation and quality of life. Lee says that public engagement in this and other infrastructure projects is critical. After all, “many communities may have to transform significantly as climate change risks increase.”

Friday 14 August 2015

Third in TechTalk Series Sparks Data Science Discussion

Karthik Shyams under led the third in the new Tech Talk series offered by Johns Hopkins Engineering for Professionals. These interactive seminars are geared toward students and faculty in the Computer Science,Cybersecurity, and Information Systems Engineering programs, but are also open to the public via live stream.
In this latest TechTalk, entitled Hadoop: A Perfect Platform for Big Data and Data Science, Shyamsunder explored the expanding fields of big data and data science. Google, Facebook, and LinkedIn, as Shyamsunder demonstrated, have changed the way products are being developed by basing their success on large-scale data collection and analysis.
Shyamsunder suggested that Hadoop has emerged as a perfect platform for processing big data since many of the tools and technologies needed for data science are built within Java.
Karthik Shyamsunder has been an instructor with Johns Hopkins Engineering for Professionals since 1999, receiving an Excellence in Teaching award. He earned his MS in computer science from Johns Hopkins University and has worked in the software industry for more than twenty-two years. He currently serves as principal technologist at VeriSign. In 2010, he was inducted into the Oracle/Java One hall of fame and has twice been awarded Oracle’s Rock Star award.
More than fifty people attended this TechTalk both in-person and online. For more information, you can review the complete slide deck or watch the recording on our YouTube channel.
To watch previous TechTalks, we invite you to visit the TechTalk playlist on our YouTube Channel. You can also subscribe to the TechTalk mailing list to receive notifications about upcoming TechTalks.

Wednesday 5 August 2015

Simple Electric Motor!

Introduction

What do windshield wipers, CD players, DVD recorders, blenders, ice makers, laptops, and walking toys have in common? They all contain electric motors. In fact, you can walk through your house and find many electric motors hidden in electrical devices, appliances, and toys in every room. The electric motors are not always obvious in devices, and you might need to do some background research about how the devices work to discover where their motors are hidden. Electric motors are an important, and even vital, part of our world today. But, you may have wondered, just how do those electric motors work? Have you ever played with magnets? If so, you are well on your way to understanding how simple electric motors work. Magnets produce a magnetic field with a north pole and a south pole. If you try to push the north poles of two magnets together, they will not want to come together. Instead, they will repel each other. The same thing happens if you try to push two south poles together. If, however, you bring the north pole of one magnet close to the south pole of another, they will attract each other and stick together. In summary, like poles (north-north or south-south) repel, opposite poles (north-south) attract. The stronger the magnets, the more forceful the attraction / repulsion is between them. As you've probably seen, magnets are typically black, so there is no visible way to tell which end is north and which is south. You can detect the existence of a magnetic field and identify the north/south pole with a compass (which is basically a bar magnet mounted so that it can rotate), as shown in Figure 1, below.
Figure showing how to detect the existence of a magnetic field with a compass 
Figure 1. The top part of this diagram shows how the needle of a compass aligns in the presence of a bar magnet, revealing the poles of the magnet. A compass needle is basically a small bar magnet, as shown in the lower diagram. As opposite poles attract, the north pole of the needle will be attracted to the south pole of the magnet. A permanent magnet (further explained below) is represented in this diagram. This method to find the poles of a magnet can also be used to detect the presence and direction of a magnetic field around a temporary magnet (also further explained below).

An electric motor uses the attracting and repelling properties of magnets to create motion. An electric motor contains two magnets; in this science project, you will use a permanent magnet (also called a fixed or static magnet) and a temporary magnet. The temporary magnet is also called an electromagnet. A permanent magnet is surrounded by a magnetic field (a north pole and a south pole) all the time (hence the term "permanent"), but the electromagnet creates a magnetic field (a north pole and a south pole) only when electric current is flowing through a wire (hence the term "temporary"). The strength of the electromagnet's magnetic field can be amplified by increasing the current through the wire, or by forming the wire into multiple loops. Such loops of electrical wire are often called a coil

To make an electric motor, the electromagnet (the temporary magnet) is placed on an axle so it can spin freely. It is then positioned within the magnetic field of a permanent magnet. This is when things get interesting! When a current is passed through the electromagnet, the resulting temporary magnetic field (made up of a north pole and a south pole) interacts with the permanent magnetic field (made up of a north pole and a south pole) to create attractive and repelling forces. These forces push the electromagnet, which freely spins on its axle, and an electric motor is born. The strength of the permanent magnet and the electromagnet will play a role in the strength of the repelling or attracting forces, and thus, in the speed at which the motor is spinning.

You can actually predict in which direction the coil will be pushed (or in which direction the motor will spin) with Fleming's left-hand rule for motors. Hold your left hand out, as shown in Figure 2 below, with the thumb, pointer, and middle fingers at right angles to each other and imagine arrows at the end of these three fingers. Your pointer finger represents the direction of the magnetic field of the permanent magnet (from north pole, pointing toward your palm, to south pole, pointing away from your finger). Your middle finger represents the direction of the electric current in the wire (which flows trough the wire from the positive terminal of the battery to the negative terminal of the battery). The direction of the force or push on the wire is predicted by the direction in which your thumb is pointing.
Drawing illustrating Fleming's left-hand rule for motors. 
Figure 2. This diagram shows Fleming's left-hand rule for motors: the thumb represents the direction of the force (or push) on the wire, the pointer finger represents the direction of the magnetic field, and middle finger represents the direction of the electric current. Note that all fingers are at right angles to each other.

Can you apply this rule to the current in the short piece of wire shown in Figure 3, below? Hold your left hand with your middle finger pointing to the right (the direction of the current), your pointer finger pointing at a right angle to the middle finger (direction of the magnetic field, represented by the black dotted arrows in Figure 3), and your thumb at a right angle with respect to your middle and pointer fingers. Is your thumb pointing up? It should be, as in this configuration, where the wire will be pushed upward.
Figure showing the direction a current carrying wire will be pushed when placed in a permanent magnetic field based on Fleming's left-hand rule for motors 
Figure 3. Diagram showing the direction in which a current-carrying wire (electromagnet) will be pushed when placed in a permanent magnetic field, based on Fleming's left-hand rule for motors. The direction of the permanent magnetic field—from north pole to south pole—is represented by black dotted arrows in this diagram.
Knowing how a current-carrying wire moves, what would happen if the wire was bent into a loop? Figure 4, below, will help you find out. You can (in your imagination) break the loop up into individual segments of straight wire, analyze those using Fleming's left-hand rule, and use this to determine which way the loop will move. Figure 4 shows the loop broken up into a wire close to the south pole and one close to the north pole. Using Fleming's left-hand rule shows that the segment closer to the south pole is pushed up, and the segment closer to the north pole is pushed down. In other words, the two sides of the loop are pushed in opposite directions, right? When the wire loop is placed on an axle, these pushes in opposite directions cause it to spin. (Note, no force or push is created when the magnetic field and the current run parallel to each other.)
Figure showing the direction a current carrying wire coiled in a loop will be pushed when placed in a permanent magnetic field based on Fleming's left-hand rule for motors 
Figure 4. Diagram showing the direction in which a current-carrying wire loop (electromagnet) will be pushed when placed in a permanent magnetic field, based on Fleming's left-hand rule for motors. The direction of the permanent magnetic field—from north pole to south pole—is represented by black dotted arrows in this diagram.
The electromagnet is most often a coil, or a bundle of loops. Because all loops of wire are parallel, each loop will get the same push. Adding up all those pushes, or motions, creates the nice spinning movement of a motor.
If you are a little frustrated that you do not understand exactly how Fleming's left-hand rule works, don't worry! Just keep it in mind as you make the motor, study it, and try to understand the physics behind it again once you have seen the motor running. If it is still difficult to understand.

To make a motor, the electromagnet must spin in full circles. Let us get a little more practice with Fleming's left-hand rule of motors and predict the direction of motion for different positions of a current-carrying coil placed in a permanent magnetic field and see what happens. Scientists use schematic drawings (diagrams) of electric circuits. Two such drawings can be found in Figure 5, below. They both represent a battery-powered current-carrying coil (or electromagnet) placed in a magnetic field. Drawing B results from Drawing A, as the electromagnet rotates over 180 degrees. Use Fleming's left-hand rule to predict in which direction the coil will turn for Drawing A and for Drawing B.

Schematic drawings to determine the direction a current caring loop of wire will move when placed in a permanent magnetic field.
Figure 5. Schematic drawings are used to predict in which direction a current-carrying coil will move when placed in a permanent magnetic field. The blue arrows indicate the magnetic field (away from the north pole), and the red arrows indicate the direction of the current (positive terminal to negative terminal of the battery). The motion of the coil can be determined using Fleming's left-hand rule for motors.

Did you predict that the direction of rotation in Drawing A would be opposite to the direction in Drawing B? That is correct. These opposite forces will make the electromagnet flip forward and back, but never let it make a full turn. To create a motor, the electromagnet needs to rotate continuously, either clockwise or counterclockwise. Before you read on, can you think of a way to make the electromagnet spin around continuously?

There are actually several ways to make the electromagnet placed in a permanent magnetic field spin. The solution applied in this science project uses Newton's first law of motion , which states that an object in motion remains in motion unless acted upon by an outside force. This means that when the electromagnet is spinning, it will continue to coast through a rotation unless something stops it. As discussed above, if current is always flowing through the wire, the resulting pushes will oppose each other, and the coil will bounce back and forth, but not spin continuously. However, if we can make the current flow only half of the time, all the pushes are in the same direction. This means the coil is actively pushed one-half of each rotation while current is flowing, and "coasts" through the next half while no current is flowing, until it comes around and receives the next push. This allows the motor to spin continuously. If this is your first experience with electrical circuits, it is important to remember that electrical current always needs a complete path in which to flow; in this case, from the positive to the negative terminal of the battery. If there is a gap in the circuit (for example, a disconnected or broken wire), the current will stop flowing.

This science project walks you through the process of creating your own simple electric motor. You will start by creating an electromagnet suitable for the motor. This temporary magnet will then be placed in a permanent magnetic field and off it goes!

Terms and Concepts

  • Electric motor
  • Magnet
  • Magnetic field
  • North pole
  • South pole
  • Repel
  • Attract
  • Permanent or static magnet
  • Temporary magnet
  • Electromagnet
  • Electric current
  • Axle
  • Fleming's left-hand rule for motors
  • Beakman's motor
  • Electric circuit
  • Electrically insulating

Tuesday 28 July 2015

Paper Circuit

Introduction

Have you ever made a painting or drawing that included lights, like light from the sun, or from the windows of a house at night? Do you think it would be fun if those light sources could actually light up? That is what paper circuits allow you to do—build real lights directly into your drawings or paintings, like the one in Figure 1.
paper circuit LED flowers

Figure 1. An example of a paper circuit that includes real lights in the centers of the flowers.An electrical circuit is a loop where electricity can flow. A basic circuit requires a battery, which stores electricity (other types of circuits can get electricity from other places, like a wall outlet). The battery must be connected to a light with materials that let electricity flow easily (kind of like water flowing easily through a pipe). These materials are called conductors (materials that do not let electricity flow easily are called insulators). Figure 2 shows a diagram of a basic circuit.
A diagram of a basic circuit.
Figure 2. A diagram of a basic circuit. Electricity is supplied by the battery. It flows in a loop through the conductor (which, in this figure, is a wire), to the light, and then back to the battery.
Conductors for most circuits (like the wires for the lights in your house, or inside a computer) are made out of copper wire, because copper is a very good conductor. However, there are many different options for conductive materials in paper circuits, as shown in Figure 3.

Conductors used in paper circuits

Figure 3. The conductive materials you might test in this project. From top to bottom: artist's graphite pencil, #2 pencil, conductive ink, electric paint, copper tape, and aluminum foil.

There are also different types of batteries, as shown in Figure 4. You might be familiar with AA or AAA batteries, commonly used in toys and electronic devices.Coin cell batteries—the type found in watches—are tiny, flat, and lightweight. 9 volt batteries are bigger and heavier, but have a higher voltage, which is how hard the battery "pushes" on the electricity (the coin cell batteries in this project are only 3 volts [V]). A higher voltage can "push" electricity through a less conductive material, whereas a low voltage requires a very conductive material in order to push a lot of electricity through.
9 volt and coin cell battery

Figure 4. A 9 V battery (left) and a coin cell battery (right). In this project, you will test each of the conductive materials shown in Figure 3 with the batteries in Figure 4, to light up a tiny light called an LED (which stands for light-emitting diode). Which materials do you think will work with which battery? What combination do you think will be the "best" overall for an art project? Read the Questions and Bibliography sections to get started making your hypothesis.

Terms and Concepts

  • Circuit
  • Conductor
  • Insulator
  • Battery
  • Coin cell battery
  • 9 volt (V) battery
  • Voltage
  • Light-emitting diode (LED)

Questions

  • What are some different materials that can be used as conductors in paper circuits?
  • What are some examples of paper circuit projects? Hint: Do an internet search for "paper circuit" and look at some of the projects that come up.
  • Look closely at the example paper circuit projects you find.
    • What type of conductive material do they use?
    • What type of battery do they use?
  • Do a search to see what types of materials usually make "good" conductors, and what types are poor conductors.

Materials and Equipment

The following materials are available from SparkFun Electronics:
  • 5 mm copper tape, SparkFun Electronics part # PRT-10561
  • Electric paint pen, SparkFun Electronics part # COM-11521
  • Conductive ink pen, SparkFun Electronics part # COM-13254
  • 9 volt battery, SparkFun Electronics part # PRT-10218
  • 2032 coin cell battery, SparkFun Electronics part # PRT-00338
  • Alligator clip test leads, SparkFun Electronics part # PRT-12978
    • Note: These are sold as a 10-pack, but you only need 2 for this project.
  • Pack of assorted LEDs, SparkFun Electronics part # COM-12062
    • Note: You only need a few LEDs for this project, but you can use additional ones for your artwork.
The following materials are available from home or an art supply store:
  • Artist's graphite pencil(s) and/or #2 pencils, an art supply store.
    • Note: Pencils are labeled with letters and numbers that indicate a hardness scale. For example, #2 pencils might also have the letters "HB" on them. The pack of graphite pencils listed above contains 2B, 4B, and 6B pencils. To learn more about the pencil hardness scale, If you buy multiple pencils with different hardness ratings, you can test all of them.
  • Aluminum foil
  • Printer paper or construction paper (at least 6 sheets)
  • Scotch® tape
  • Metric ruler
  • Scissors
  • Thin paintbrush
  • Drawing or painting materials of your choice (markers, colored pencils, crayons, etcetera)
  • Newspaper to protect your work surface
  • Lab notebook

Thursday 16 July 2015

Use a homemade electronic tester to find out if electricity can flow between two objects.

Introduction

Electricity is like water in a river, it flows. For example, when you turn on a lamp, electricity flows in through the power cord, then it flows through the lightbulb, and finally, it flows back out through the power cord. Electricity flows through conductors. Most metals are good conductors. Copper is an excellent conductor, so it is used in power cords. To keep the electricity from flowing where it is not supposed to go, conductors that carry electricity are surrounded by insulators. Plastic and rubber are good insulators, which is why they are used to coat power cords. If electricity is like water flowing down a river, the conductors are like the sides of the river—they keep it within certain areas. 
Electricity has to flow into and out of an object to provide power, and the path of the electricity is called a circuit. A circuit is a circular journey. In an electrical circuit, the electricity makes a circular journey through the device it is powering. For example, when a lamp is turned on, a circuit is formed from the socket in the wall, through the lamp, and then back to the socket. If the path of the electricity is broken, then the flow of electricity is stopped and the power to the device is turned off. The role of switches is to break the flow of electricity. A common type of switch has two pieces of metal that touch to make a circuit, and separate to break the circuit. More complex switches are used in electronic devices, but the basic idea is the same, they interrupt the flow of electricity.
You can test whether two objects are connected in a circuit using a device called a circuit tester (also called a continuity tester). In this electronics science fair project, you will make your own circuit tester. To determine if there is a path for electricity through a lamp, you will unplug it and attach probes to the prongs of the plug. When it is plugged in, electricity flows into the lamp from one prong and out through the other prong. By attaching your circuit tester to the two prongs, you can determine if there is a closed circuit for the flow of electricity. You will also determine how the lamp switch and the type of lightbulb affect the flow of electrical current.

Terms and Concepts

  • Conductor
  • Insulator
  • Circuit
  • Switch
  • Circuit tester
  • Continuity tester
  • Closed circuit
  • Current
  • Circuit diagram
  • Alternating current

Questions

  • What word is used by scientists to describe the flow of electricity? Hint: Think of the word for "moving water."
  • How many types of switches can you find in your house?
  • What is the definition of an open circuit?
  • What is voltage?
  • How are current and voltage related?
  • What are some examples of good conductors and good insulators?

Materials and Equipment

Experimental Procedure

Note Before Beginning: This science fair project requires you to hook up one or more devices in an electrical circuit. Basic help can be found in the Electronics Primer. However, if you do not have experience in putting together electrical circuits you may find it helpful to have someone who can answer questions and help you troubleshoot if your project is not working. A science teacher or parent may be a good resource. If you need to find another mentor, try asking a local electrician, electrical engineer, or person whose hobbies involve building things like model airplanes, trains, or cars. You may also need to work your way up to this project by starting with an electronics project that has a lower level of difficulty.
Important Safety Notes Before You Begin:
  • All devices that are tested should be disconnected from a power source.
  • Don't take any electrical appliances apart to test components inside.
  • Do not go near the sockets in the wall with the circuit tester.

Continuity tester.
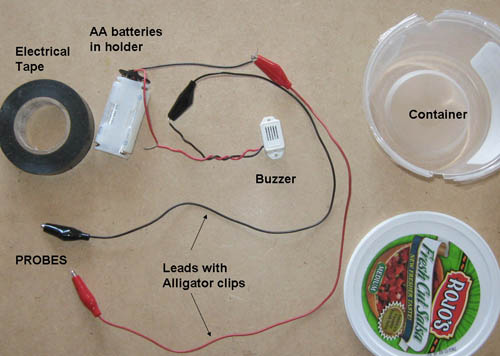
Figure 1. The partially assembled circuit tester. The connections have not been wrapped with electrical tape yet. The tester will buzz if current can flow between the two probes. The probes can be stored in the container when not in use.

Setting Up the Circuit

  1. Strip about 2 cm of insulation from the end of the battery pack's red wire. If you have never used wire strippers before, ask an adult for help or see the video at the bottom of the Science Buddies Wire Stripping Tutorial page.
  2. Strip about 2 cm from the end of the red wire from the buzzer.
  3. Twist the ends of the red wires together from the battery pack and the buzzer. Important: pay attention to the wire colors! If you twist the battery pack's red wire to the buzzer's black wire, the buzzer will not work at all. Make sure you twist the battery pack's red wire to the buzzer's red wire.
  4. Wrap electrical tape around the exposed twisted red wires.
  5. Attach a black alligator clip to the black wire from the buzzer.
  6. Wrap electrical tape around the black alligator clip and the black wire from the buzzer.
    1. Even though the alligator clip is insulated, there is a chance the bare wire might touch another bare wire. The electrical tape ensures the bare wire is insulated.
  7. Attach a red alligator clip to the black wire from the battery pack.
    1. Wrap electrical tape around the red alligator clip and the black wire from the battery holder to insulate the bare wire.
  8. Put the two AA batteries into the AA battery pack. Important: Make sure that the "+" symbols on the batteries line up with the "+" symbols inside the battery pack.
  9. Touch the red and the black probes together. You should hear a buzz from the buzzer. If you don't, check the batteries and your connections and try again. See Figure 2.

Continuity tester.
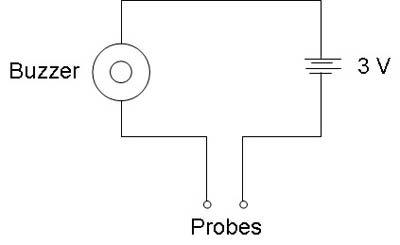
Figure 2. Diagram for the circuit tester. When the two probes are connected to a conductor, current flows through the circuit, activating the buzzer.

Housing the Tester

  1. Thoroughly clean and dry a 16-oz. plastic container and its snap-on top.
    1. Figures 1 and 3 show a salsa container. You can use whatever type of container you choose.
  2. Use the scissors to cut two notches in the top rim of the base of the plastic container. Refer back to Figure 1, above. Have an adult help you with this step.
  3. Place the buzzer, the battery pack and the wires inside the plastic base.
  4. Rest the wire for the red probe in one of the notches, so that the probe is on the outside of the container.
  5. Rest the wire for the black probe in the other notch, so that the probe is on the outside of the container.
  6. Punch five holes in the lid, using the hole punch or a screwdriver. This will make it easier to hear the buzzer.
  7. Place the lid on top of the container.

Testing the Flow of Electricity

Important Note: The circuit tester can be used to determine whether two things are electrically connected to each other. If two things are electrically connected, current can flow between them. The tester will buzz if current can flow between the two probes. Caution: Make sure anything you choose to test is not plugged into a wall socket or powered by batteries.
  1. Check to make sure an incandescent lightbulb is in the lamp.
  2. Plug the lamp in and turn it on to test that the light bulb works. If it does not light, replace the lightbulb with a new incandescent light bulb.
  3. Turn the lamp off.
  4. Unplug the lamp.
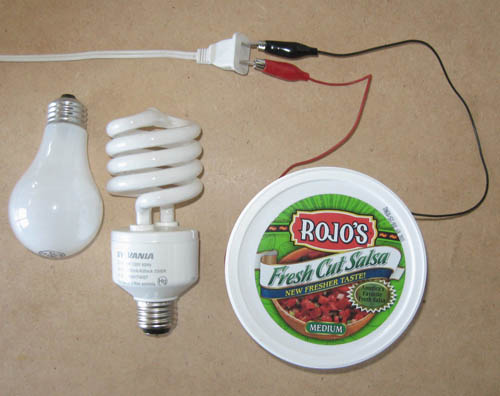
  5. Attach one probe to each prong of the plug. See Figure 3.


Continuity tester.
Figure 3. Circuit tester attached to lamp plug. The two kinds of lightbulbs are shown: incandescent bulb (left) and energy-saving fluorescent bulb (right).
  1. Does the buzzer make a noise? Record your observations in your lab notebook in a data table, like the one below.

Lamp (Unplugged)
Light bulbSwitchBuzzer (On/Off)
IncandescentOn 
IncandescentOff 
FluorescentOn 
FluorescentOff 

  1. Turn the lamp switch ON. Note: The lamp should remain unplugged at all times.
  2. Does the buzzer make a noise now?
  3. Remove the incandescent light bulb.
  4. What happened to the circuit when the light bulb was removed?
  5. Replace the incandescent light bulb with the energy-saving fluorescent light bulb.
  6. What happens to the buzzer?
  7. Turn the switch on the lamp OFF.
  8. What happens to the buzzer now?
  9. Explain your results.
    1. Look inside the incandescent light bulb. Do you see why there is a circuit?
    2. For the energy-saving light bulb, how would you explain your results? Hint: What is needed in this kind of lightbulb to make electricity flow?
  10. Repeat steps 1–15 with two different lamps.

Saturday 4 July 2015

How Well Do Different Materials Create Static Electricity

Introduction

Static electricity is the build-up of electrical charge in an object. Sometimes static electricity can suddenly discharge, like when a bolt of lightning flashes through the sky. Other times, static electricity can cause objects to cling to each other, like socks fresh out of the dryer. The static cling is an attraction between two objects with different electrical charges, positive (+) and negative (-). 
You can create static electricity by rubbing one object against another object. This is because the rubbing releases negative charges, called electrons. The electrons can build up to produce a static charge. For example, when you shuffle your feet across a carpet you are creating many surface contacts between your feet and the carpet, allowing electrons to transfer to you you, building up a static charge on your skin. You can suddenly discharge the static charge as a shock when you touch a friend or some objects. Similarly, when you rub a balloon on your head it causes opposite static charges to build up in your hair and in the balloon. When you pull the balloon slowly away from your head, as shown in Figure 1, below, you can see these two static charges attracting each other - your hair stands on end, and tries to stick to the balloon!
Girl with static hair and balloon
Figure 1. Static electricity makes your hair stand up! (NASA, 2004)
How can static electricity be measured? One way is to use an electroscope. An electroscope is a scientific instrument that detects if there is an electrical charge, and it can show how big the electrical charge is. A drawing of one type of electroscope is shown in Figure 2, below. How does it work? An electrical charge is transferred to the electroscope (by touching it, as shown with the dark green rod), and the electrical charge goes into two separate metal pieces on the electroscope. In the drawing below, these two pieces are in yellow, and represent two thin pieces of gold. The electrical charge makes both of these pieces have the same charge. While objects that have opposite charges are attracted to each other (like the balloon and your hair), objects that have the same charge (such as in the electroscope) are actually repelled by, or pushed away from, each other. In the electroscope drawing, the two pieces of gold have become charged with the same charge (they are either both negatively charged, or both positively charged), so they are pushed apart from each other. The bigger the charge, the further apart the two pieces are pushed. If the gold pieces have no charge (in other words, they are neutral), or they have opposite charges, then they will hang straight down, touching each other.
Diagram of an electroscope.
Figure 2. This is a drawing of a simple electroscope. When the electroscope receives an electrical charge (from the green rod at the top), the two gold pieces (in yellow) push apart from each other. The bigger the charge the electroscope receives, the further apart the gold pieces are pushed. If the gold pieces have no electrical charge, they will hang straight down, touching each other. (Image credit: User Stw)
In this science project you will build a homemade electroscope to test several objects made out of different materials to see which ones produce, or conduct, the most static electricity. Then you will put your results together to formulate a triboelectric series, which is an ordered list that describes the type of charge an object has as a result of static electricity. The results may shock you!

Terms and Concepts

  • Static electricity
  • Electrical charge
  • Electrons
  • Electroscope
  • Neutral
  • Triboelectric series

Questions

  • How can static electricity be measured?
  • How do different materials react to static electricity?
  • Which materials are neutral and which ones are charged?
  • How does an electroscope work?

Bibliography

This idea was adapted from a project on how to build an electroscope on the ZOOM science activities website hosted by PBS Kids:
  • PBS Kids. (n.d.). Science Rocks! Electroscope. ZOOM, WGBH Educational Foundation, Boston, MA. Retrieved March 28, 2006, from

Materials and Equipment

  • Styrofoam™ cup
  • Sharp pencil or skewer
  • Plastic drinking straw
  • Aluminum pie pan
  • Tape
  • Optional: Clay
  • Scissors
  • Thread
  • Aluminum foil
  • Styrofoam plate. Alternatively, the Styrofoam lid from a take-out food container would work too.
  • Balloon
  • A desk or table that is not metal. For example, a wooden, plastic, or glass desk or table would work. This is because these materials do not conduct electricity as well as metal does.
  • Wooden ruler, metric
  • Different materials to test (at least 3). They should be no larger than the plate, or be able to be folded to be this small, and be able to be laid flat. Small samples of different fabrics are usually available at stores that sell fabric. For example, you could pick at least three of the following materials:
    • Polyester
    • Nylon
    • Cotton
    • Wool
    • Silk
    • Aluminum
    • Plastic wrap
    • Plastic, such as a flat, plastic comb
    • Copper
    • Wood
    • Tissue paper
  • Lab notebook

Experimental Procedure

  1. First you will make an electroscope to test for the presence of static electricity in different materials. Your electroscope will look different from the one in Figure 2 in the Introduction, but it will work the same way. Instead of using two gold pieces, your electroscope will use an aluminum pan and an aluminum ball on a string. When it is finished, your electroscope will look like the one in Figure 6. We will explain more about how this design works in a moment. Here is how to make the electroscope:
    1. Make two holes near the bottom of a Styrofoam cup on opposite sides. A good way to do this is by pushing a sharp pencil or skewer through the cup.
    2. Push a plastic straw through both of the holes in the cup so that your setup now looks like Figure 3.

      A straw in the bottom of a Styrofoam cup, the first step of making an electroscope
      Figure 3. After making a two holes in the cup, push a plastic straw through both of them.
    3. Either securely tape the cup's opening to the aluminum pan, as shown in Figure 4, or use clay to hold the cup to the pan. If you are using clay, stick four little balls of clay (each about 2 centimeters [cm] in diameter) to the rim of the cup, then turn the cup upside down and stick it to the bottom of the aluminum pie pan using the clay.
    4. Carefully adjust the straw's position so that one end of the straw is right above the edge of the pan, as shown in Figure 4.

      A cup (with a straw through it) taped to an aluminum pan.
      Figure 4. Secure the cup's top to the aluminum pan by either using tape, as shown here, or small balls of clay. Carefully move the straw so that one end is right above the pan's edge.
    5. Cut a piece of thread with a length that is about two or three times the distance between the straw and the pan's edge. Tie a few knots in one end of the thread.
    6. Cut a square of aluminum foil that is about 3 cm on each side. Use it to make a ball around the knots in the thread, as shown in Figure 5. The ball should be about the size of a marble or a little smaller. It should be just tight enough so it does not fall off the thread.

      A piece of thread with a small ball of aluminum foil on one end.
      Figure 5. Make a small ball of aluminum foil fit securely over the knots on the end of the piece of thread.
    7. Tape the thread to the tip of the straw so that the ball of foil hangs straight down from the straw, just touching the edge of the pan, as shown in Figure 6. Adjust the straw's position if needed. If the end of the thread without the ball is dangling down and touching the pan, cut the dangling part off so it does not touch the pan.

      A homemade electroscope.
      Figure 6. When you are finished, your electroscope should look similar to this one. Make sure the ball of aluminum foil is touching the edge of the aluminum foil pan.
    8. If the straw seems loose at all, tape the straw to the cup (or wedge in some clay) so the straw does not move around when you use the electroscope.
  2. To test the electroscope, create some static electricity by rubbing a blown-up balloon on a Styrofoam plate or the Styrofoam lid from a take-out food box. Rub the Styrofoam plate about 20 times with the balloon.
    1. When you rub the balloon on the Styrofoam plate, the plate gets an electrical charge, which means there is a buildup of electrons (on either object, the balloon or the plate). Even though the plate is charged, the electrons stay where they are because Styrofoam does not conduct electricity.
  3. Once you have charged the Styrofoam plate, quickly place the plate on a desk or table (make sure not to use a metal surface). Then place the electroscope on top of the Styrofoam plate. Be sure to only hold the electroscope by the foam cup and not the aluminum pan, otherwise it will not work! You should see the aluminum foil ball move away from the edge of the pan, as shown in Figure 7.
    1. What is happening? When an object, like the Styrofoam plate, gets an electrical charge, it can be either positive or negative. (If an object has a lot of electrons, it can have a negative charge, but if it does not have many electrons, it can have a positive charge. Whether an object tends to gain or loses electrons depends on the type of material it is made out of.) When a charged object (like the charged plate) touches the aluminum pan, the charge (or electrons) easily moves through the metal pan. Since the aluminum ball is touching the pan, the ball gets the same charge as the pan. This means that both the ball and pan have the same charge (they are either both positively or negatively charged). Because objects that have the same charge are repelled by each other, the ball is pushed away from the pan.
    2. If you are unsure of how this works, re-read the Introduction in the Background section.
A homemade electroscope on a styrofoam lid.
Figure 7. After putting the electroscope on the charged Styrofoam plate, the aluminum ball should move away from the aluminum pan, as shown here.
  1. Use a wooden ruler to measure the distance between the foil ball and the pan. The more charge there is, the more distance there will be. Be careful not to touch the ball or the edge of the plate with the ruler (or your body) when you measure this distance. In your lab notebook, make a data table like Table 1, and record your results in it. (This will be Trial 1 using Styrofoam.) In your data table, only list the objects you actually test.
  2. Now, touch the ball with your finger. What happens? Record any observations in the data table in your lab notebook.
ObjectType of MaterialTrial NumberDistance Between Ball and Pan (cm)Average Distance Between Ball and Pan (cm)Observations
Styrofoam plateStyrofoam1   
2 
3 
Wool hatWool1   
2 
3 
Tissue paperTissue1   
2 
3 
Piece of cotton fabricCotton1   
2 
3 
Table 1. In your lab notebook, make a data table like this one to record your results in. In this data table there are some objects listed as examples, but in your own data table only include the objects you actually test.
  1. Now that you know your electroscope works, you will use it to test the static electricity present in different materials. See the Materials section for a list of different materials to try. You will want to try at least three different types of materials. To test a material, do the following:
    1. Discharge your electroscope by touching the pan with your finger.
    2. Rub the object you want to test about 20 times with the balloon.
    3. Once you have charged the object, quickly lift up the electroscope (holding it by its Styrofoam cup) and place the object on top of the Styrofoam plate so that the object is laying flat on the plate. Make sure the object is not touching the table. Then place the electroscope on top of the object, as shown in Figure 8.
      1. Note: Putting the object on top of the Styrofoam plate will help prevent the electric charge from leaving the object before it can go into the electroscope.
    4. Use the wooden ruler to measure the distance between the foil ball and the pan, making sure not to touch the pan or ball with your ruler (or your body). Record your results in your data table. Then touch the ball with your finger and record your observations.
    5. Repeat steps 6.a. to 6.d. two more times for the same object so that you have done three trials using the same material.
    6. Repeat steps 6.a. to 6.e. for each object you want to test. Be sure to do two more trials using the Styrofoam plate (as you did in steps 2 to 5) so that you have done three trials with it. When you are done, you should have done a total of three trials with each object/material.
A homemade electroscope on pink tissue paper.
Figure 8. To test a charged object, lay it flat in between the electroscope and the Styrofoam plate, as shown here using pink tissue paper.
  1. Once you are done testing, for each object calculate the average distance between the ball and the pan for the three trials. Record your results in your data table.
    1. For example, if when testing the Styrofoam plate you measured the distance to be about 0.5 cm in trial 1, 0.75 cm in trial 2, and 0.5 cm in trial 3, the average distance would be about 0.6 cm (since 0.5 cm + 0.75 cm + 0.5 cm equals 1.75 cm, and when divided by three this equals 0.6 cm).
  2. Make a bar graph of your results.
    1. On the x-axis (the horizontal axis) put the material that was tested, and on the y-axis (the vertical axis) put the average distance between the ball and the pan. Make a bar for each material you tested.
    2. You can make a graph by hand or by using a computer program such as Create a Graph.
  3. Analyze your results.
    1. Which materials were the most electrically charged (had the largest distance between the ball and plate) and which were the least charged?
    2. Arrange the materials from most charged to least charged. This is a Triboelectric series, and can be written as an ordered list or chart. How do common objects rank in the series? You can do some additional research on Triboelectric series, such as by looking at the resources in the Bibliography, and see how your results compare to other established series. What are some similarities, and what are some differences?

Monday 22 June 2015

The Strength of an Electromagnet

Introduction

Electromagnets, or magnets that use the magnetic field created by electrical current flowing through a wire, lie at the heart of many electrical devices, ranging from simple things like doorbells to complex machines, like particle accelerators. The strength of electromagnets varies, but some electromagnets are strong enough to lift entire trains! So how does an electromagnet work? How does electric current—the movement of electric charges—make a magnet?
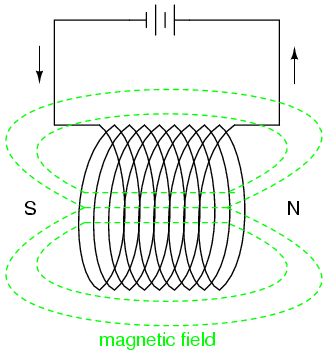
When electric current flows through a wire, it creates a magnetic field. The magnetic field around a straight wire is not very strong. But if the wire is wrapped in a coil, the fields produced in each turn of the coil add up to create a stronger magnetic field. When the coil is wrapped in the shape of a cylinder, it is called a solenoid. (See Figure 1).
Magnetic field lines of a magnetic coil.
Electronics Science science project
Figure 1. The green lines show the magnetic field surrounding a solenoid (or cylindrical coil) through which electric current is flowing. "N" and "S" indicate the north and south poles of the electromagnet.
If an electromagnet consists only of coiled wire (if it has nothing but air in its middle) then the magnet will not be very strong. But if you place a piece of iron in the middle of the coil—an iron bolt, for example—then the piece of iron, called the magnetic core or iron core of the electromagnet, will make the magnetic field much stronger (see Figure 2). This is because iron is ferromagnetic. It contains lots of tiny areas, called magnetic domains, that act like small magnets. As soon as the iron core is placed in the coil, the magnetic domains line up with the magnetic field made by the coiled wire solenoid. As a result, the strength of the magnetic field around the solenoid greatly increases.
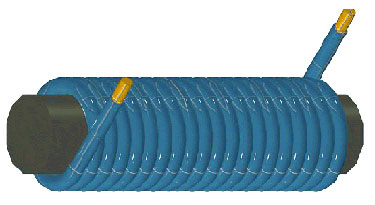
Electromagnet science fair project: diagram of an electromagnet
Electronics Science science project
Figure 2. Insulated wire (blue) wrapped around an iron core (black). Electric current flowing through the wire creates a magnetic field, a field that is magnified by the iron core.
In this science project, you will investigate how the strength of the magnetic field produced by an electromagnet changes as the number of turns in the coil increases.

Terms and Concepts

To do this project, you should do research that enables you to understand the following terms and concepts:
  • Electromagnet
  • Electric current
  • Solenoid
  • Iron core
  • Ferromagnetic
  • Magnetic domains

Questions

  • How does an electromagnet work?
  • Why does an electromagnet have magnetic properties only when energized?
  • Does increasing the current flowing through a coil of wire increase or decrease the strength of the magnetic field?
  • What does adding an iron core to an electromagnet do to the magnetic field created by the electromagnet?

Materials and Equipment 

  • The Strength of an Electromagnet kit (1). Includes:
    • 6 volt (V) lantern battery
    • Enamel-coated magnet wire, 30 AWG (75 feet)
    • Alligator clip leads (2)
    • Iron bolts; about 2 ½ inches long and ½ inch in diameter (4)
You will also need to gather these items, not included in the kit:
  • 220 grit sandpaper (about 1 square inch)
  • Masking tape (1 roll)
  • Box of steel paper clips (about 100 count)
  • Scissors or wire cutters
  • Optional: shallow plastic container, slightly longer and wider than the iron bolts

Experimental Procedure

  1. Make four different electromagnets, with 50, 100, 150, and 200 turns of wire respectively, by wrapping the magnet wire tightly around the iron bolts. See Figures 3 and 4 for example electro magnates. It is important to wrap the magnet wire neatly around the bolts. Here are some tips to make wrapping easier (if you run into trouble doing the experiment, see the FAQ for more information):
    1. Leave a tail of wire (5-6 centimeters [cm] long) at each end of the coil. You will use these wire tails to connect the coil to the battery.
    2. Make a holder for the spool of magnet wire, so you can roll the wire right off the spool. For example, you can stick a pen or pencil through the spool, and tape the pencil to a couple of small boxes.
      1. Use a small piece of masking tape to attach the wire to the iron bolt, near where the head of the bolt connects to the shaft of the bolt.
      2. Turn the iron bolt to unwind the magnet wire from the spool. Use your fingers to keep the wire tight against the bolt. Wrap each successive turn so that the wire lines up neatly. Remember that it is important to wind the wire tightly and neatly.
      3. Keep track of how many turns you make (or how many times you wrap the wire around the bolt). A turn happens each time the tape that holds the wire in place comes around. Counting turns is easier if you can recruit a helper to make tally marks for you.
        1. Troubleshooting Tip: If you are having trouble keeping track of how many turns you have made, here are two tips.
          • First, draw a line straight down the iron core using a permanent marker. Count one turn each time you pass that line.
          • Second, if you know the gauge of your magnet wire, you can look up the diameter of the wire in a table, like this one for American wire gauge. Once you know the wire's diameter, you can calculate how much of the bolt should be covered by a given number of coils. That means that 100 turns cover 1 inch of the bolt (0.01 inches x 100 = 1 inch), if the turns are right next to each other and do not overlap. So, if you wrap your coil very neatly, you can get a rough idea of how many turns are in your coil by measuring how much of the bolt is covered by the coil. Note that this method does not work if your coil has more than one layer of wire or if there are spaces between turns.
      4. When you reach the desired number of turns, tape the wire to the bolt to hold the coil in place. Cut the wire, leaving a 5-6 cm long "tail" for making the connection to the battery.
      5. Particularly for larger coils, you may need to wrap multiple layers of wire, one layer on the other, to get the desired number of turns.
    3. Use the 220 grit sandpaper to sand off 1 cm of the enamel insulation from the end of each magnet wire tail. Wire Stripping Tutorial for an instructional video that shows how to strip magnet wire.
      1. Fold a small piece of sandpaper (about the size of two postages stamps, use scissors to cut a small piece of necessary) in half, with the rough sides facing each other, to make a "sandpaper sandwich".
      2. Put the end of the magnet wire to be stripped inside the sandpaper sandwich.
      3. While softly pressing the sandpaper sandwich together, gently pull the wire through the sandpaper sandwich, turning the wire as you pull so that you remove the insulation from all sides of the wire. Or, you can rub the wire back and forth inside the sandpaper sandwich.
      4. The wire is stripped when you can see the shiny copper wire underneath.
        1. Troubleshooting Tip: It is a good idea to practice stripping the enamel insulation off a practice piece of wire. You may need some practice to get the pressure right so that the wire does not break while you sand it.
    4. Place the paper clips in a shallow container (slightly longer and wider than the electromagnet). If you do not have a shallow container, put the paperclips in a pile on a flat surface.
    5. Starting with the 50-turn coil, use the electromagnet to pick up paper clips from the shallow container.
      1. Use the alligator clip leads to connect the coil to the battery. When current flows through the coil, the coil is energized and will behave as a magnet. When no current flows through the coil, the magnetic characteristics of the electromagnet disappear.
        1. Troubleshooting Tip: After connecting the coil to the battery, you can check that the electromagnet works by touching a paper clip to the coil. If the paper clip sticks, then the electromagnet is working. If the paper clip does not stick, then the electromagnet is not working. If this is the case, make sure that the alligator clips are connected to both the battery and the wire. One end of each lead should be clipped to one of the terminals of the battery (one lead to each terminal), and the other end of each of lead should be clipped to the stripped part of the magnet wire (one lead to each end of the wire). If the clip leads are connected correctly to the coil and battery but the electromagnet is still not working, then the problem may be that the magnet wire was not completely stripped. Try re-sanding the ends of the magnet wire until all of the reddish insulation is gone, then reconnect and retest the electromagnet.
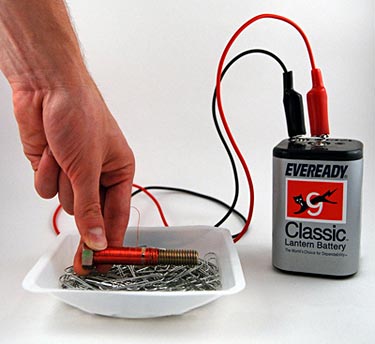
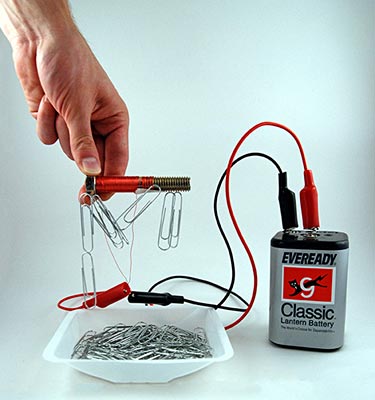
      2. Touch the energized coil (lengthwise) to the paper clips, and then pull the coil away from the tray. See Figures 3 and 4.
        Electromagnet science fair project idea: electromagnet picking up objects
Electronics Science science project
        Figure 3. After connecting the alligator clip leads to the battery and wire on the coil, the electromagnet will be energized. Lower the electromagnet into the container of paper clips so that the long part of the electromagnet touches the paper clips.

        Electromagnet physics electricity science fair project idea: electromagnet with paper clips
Electronics Science science project
        Figure 4. Once you have touched the electromagnet to the paper clips, lift the electromagnet up. Some of the paper clips will stick to the electromagnet. Move the electromagnet away from the container (so that the paper clips will not fall back into the container) and then disconnect the coil from the battery.
      3. Once the coil is no longer over the container, disconnect the coil from the battery, and count how many paper clips the coil picked up. Record the number in your lab notebook. Organize your data in a table like Table 1.
      4. Repeat steps 4a to 4c four more times, for a total of five trials.
    6. Repeat step 4 for the 100-, 150-, and 200-turn coils.
    7. Calculate the average number of paper clips lifted by each coil (see Table 1).
    Number of Turns on CoilsNumber of Paper Clips Picked Up
    12345Average
    50
    100
    150
    200
    Table 1. Record the number of paper clips each coil picked up in each of the five trials and then calculate the average for the five trials.

    Analyzing the Data

    1. Make a graph of the results. Plot the number of paper clips picked up (y-axis) versus the number of turns in the coil (x-axis). If you need help making a graph, try using the Create a Graph website.
    2. Does the number of paper clips picked up by the coil increase or decrease as you increase the number of turns in the electromagnet?